When your RV’s lights go dark or power suddenly cuts out in the middle of nowhere, quick electrical diagnosis can save your trip. Most common RV electrical problems stem from four core issues: 12V system failures, shore power connection problems, battery drainage, and tripped breakers. BlackSeries RVs feature robust electrical systems including 12V AGM/LiFePO4 batteries, shore power integration, inverters, and solar inputs: but even the most advanced systems need proper troubleshooting when issues arise.
Quick Diagnosis Card:
- No lights = Check 12V battery voltage and main fuses
- No shore power = Test GFCI reset and campground supply
- Fast battery drain = Look for parasitic loads and loose connections
- Tripped breakers = Reduce electrical load and reset safely
Understanding RV Electrical Systems
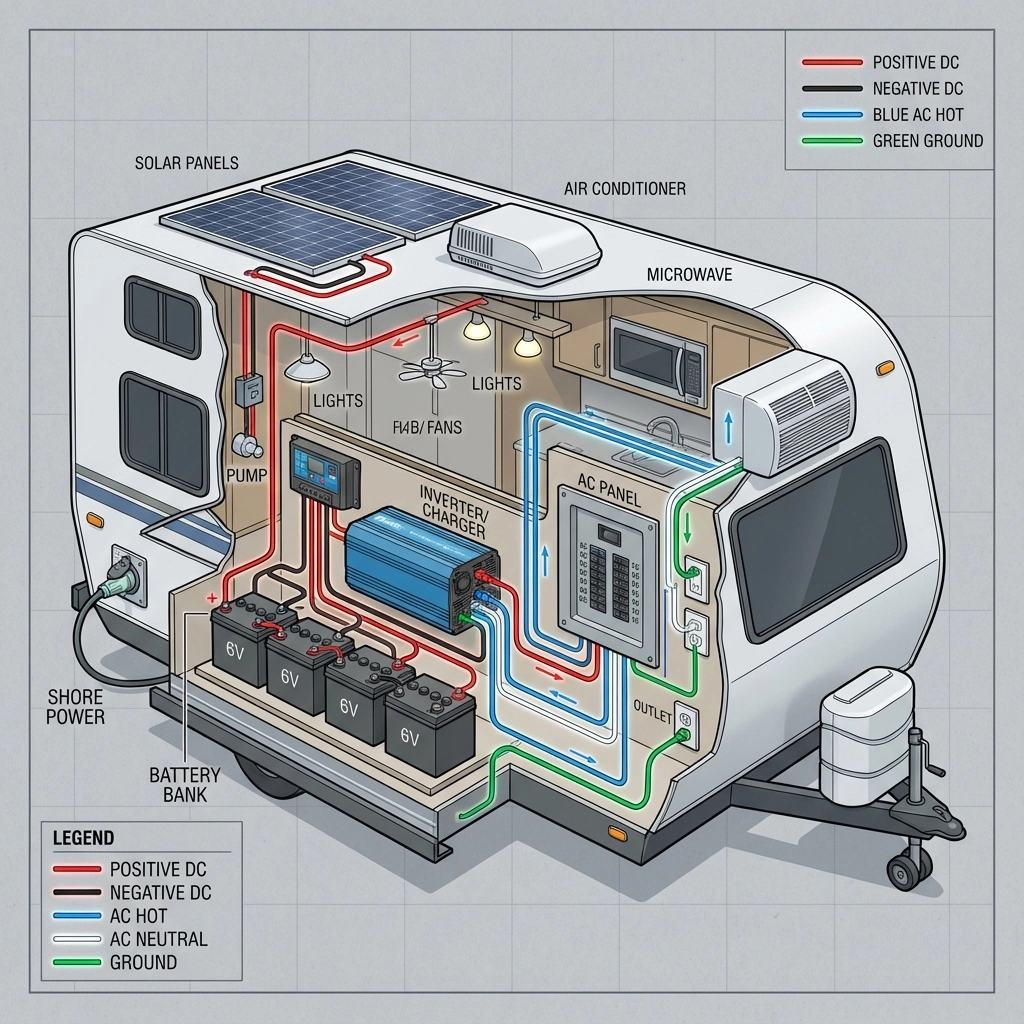
Modern RVs operate on dual electrical systems that work together to power your adventure. The 120V AC system connects to shore power or generators to run major appliances like microwaves, air conditioners, and standard outlets. The 12V DC system powers lights, fans, water pumps, and charges from your battery bank when off-grid.
BlackSeries off-road trailers feature enhanced electrical configurations compared to traditional RVs. Our systems include high-capacity lithium battery banks, robust solar charging arrays, and heavy-duty inverters designed for extended off-grid use. This means more complex troubleshooting scenarios but also greater electrical independence for remote adventures.
Key US electrical standards (NEC and RVIA) require proper grounding, GFCI protection, and specific wire gauges for different loads. Understanding these basics helps identify when problems require professional attention versus DIY fixes.
Most Common RV Electrical Issues in the US (2026)
Based on 2026 RV maintenance data, over 60% of electrical problems stem from loose wiring connections or blown fuses, while 40% of forum discussions focus specifically on 12V system failures. Here are the top issues American RV owners face:
Lights Not Working: Usually indicates 12V problems, blown fuses, or bad ground connections. Start with battery voltage testing.
Battery Draining Fast: Often caused by parasitic draws from appliances left on, faulty charge controllers, or aging batteries unable to hold capacity.
No Shore Power: GFCI outlets tripped, bad power pedestals, or faulty RV power cords prevent 120V from reaching your systems.
Dead 12V System: Main breakers tripped, converter failure, or battery bank completely discharged require systematic diagnosis.
Breakers Tripping Repeatedly: Circuit overload from running too many high-draw appliances simultaneously, especially air conditioning and microwaves.
Solar Not Charging: Blocked panels, failed charge controllers, or wiring issues prevent battery charging during daylight hours.
Inverter Not Working: Overload protection, overheating, or DC input problems stop AC power conversion when off-grid.
Step-by-Step RV Electrical Troubleshooting
Step 1: Visual Inspection
Start every diagnosis with a thorough visual check. Look for loose wire connections, corroded battery terminals, melted wire insulation, or burn marks around electrical panels. BlackSeries owners should pay special attention to connection points after off-road travel, as vibration can loosen terminals more than highway driving.
Check all fuses in your main panel and auxiliary fuse boxes. A blown fuse appears burnt or has a broken filament visible through the clear plastic. Replace only with identical amperage ratings: never use higher-rated fuses as “temporary fixes.”
Step 2: Test Your 12V System
Use a digital multimeter to measure battery voltage at the terminals. A healthy 12V battery should read 12.6-12.8V when fully charged and not under load. If voltage drops below 12.0V, your battery needs charging or replacement.
Test your main 12V breaker by switching it off and back on. Check the battery management system (BMS) display if equipped: many modern lithium systems show fault codes when problems occur.
For more detailed battery maintenance and testing procedures, reference our comprehensive Lithium Battery Off Grid Trailer Power Guide for system-specific troubleshooting steps.
Step 3: AC 120V Troubleshooting
First, confirm the campground power pedestal is working by testing outlets with a known-good device. Check your surge protector status: many units have indicator lights showing power quality and ground fault conditions.
Reset any tripped GFCI outlets by pressing the TEST button, then RESET. GFCI outlets protect against ground faults and must be reset manually after tripping. This single step solves many “no power” complaints.
Test your RV’s main breaker panel for tripped breakers. A tripped breaker sits in a middle position between ON and OFF: flip it fully OFF, then back to ON to reset properly.

Step 4: Solar System Diagnostics
Check your charge controller display or indicators. Most modern units show charging status, battery voltage, and solar input levels. Zero solar input during sunny conditions indicates panel or wiring problems.
Inspect solar panels for shading, dirt, or physical damage. Even partial shading can dramatically reduce output. Clean panels with soap and water if dirty.
Measure voltage output at the panels using your multimeter. Disconnect the charge controller input and test panel voltage in direct sunlight: you should see 18-22V from standard 12V panels.
Step 5: Inverter Troubleshooting
Check inverter status lights or displays for error codes. Common problems include overload (too many appliances), overheating (blocked ventilation), or low battery voltage (below inverter cutoff).
Verify DC input voltage at the inverter: most units require 11.5-12.0V minimum to operate. Test AC output with your multimeter set to AC voltage; you should read 110-120V at the inverter outlets.
Our Travel Trailer Inverter Guide provides detailed inverter sizing and troubleshooting specific to BlackSeries systems.
Step 6: Advanced Electrical Diagnostics
Use your multimeter’s continuity function to test wire integrity. A continuous circuit shows zero resistance, while broken wires show infinite resistance (OL on digital meters).
Check for parasitic drains by disconnecting your battery positive terminal and measuring current flow with the multimeter in series. Draws above 50-100 milliamps indicate problems like stuck relays or appliances not fully turning off.
Test your converter/charger output while plugged into shore power. You should see 13.6-14.4V at the battery terminals during charging mode.
Safety Best Practices During RV Electrical Diagnosis
Always disconnect shore power and turn off the battery disconnect before working on electrical systems. Even 12V systems can cause fires or injury if short circuits occur.
Wear insulated gloves and safety glasses when testing electrical components. Keep a fire extinguisher nearby: electrical fires spread quickly in RVs due to confined spaces.
Never work on 120V systems in wet conditions. Water and electricity create deadly combinations, especially in outdoor camping environments.
Don’t open electrical control boxes unless you’re qualified. Many components carry lethal voltages even when the main power is off due to capacitor storage.
RV Electrical Maintenance Checklist (Printable)
Before Every Trip:
- Test battery voltage and specific gravity (if lead-acid)
- Inspect shore power cord for damage or worn plugs
- Test all lights, outlets, and critical appliances
- Check that all breakers are reset and functioning
Monthly Maintenance:
- Clean battery terminals and check torque specifications
- Test solar charging system performance and output
- Inspect visible wiring for damage, corrosion, or loose connections
- Check and test GFCI outlet function
Quarterly Tasks:
- Deep clean solar panels and check mounting hardware
- Test inverter efficiency and ventilation clearances
- Inspect electrical panel for signs of overheating or corrosion
- Update battery equalization (if lead-acid) or BMS firmware
For comprehensive maintenance schedules covering all RV systems, consult our Off Road Trailer Maintenance Guide 2026.
The Best Tools & Meters for RV Electrical Diagnosis
Digital Multimeter: Essential for voltage, current, and continuity testing. Look for auto-ranging models with large displays for outdoor use.
Battery Hydrometer: Tests specific gravity in lead-acid batteries to determine charge state and cell health.
Solar MC4 Connector Tool: Safely disconnects solar panel wiring for testing without damaging expensive connectors.
Infrared Thermometer: Identifies hot spots in electrical connections that indicate loose terminals or overloaded circuits.
Circuit Tester: Quickly identifies hot, neutral, and ground wires in 120V outlets without using a multimeter.
Scenario-Based Troubleshooting: Real RV Power Problems
Case A: Shore Power Connected But RV Has No Electricity
Symptoms: Plugged into campground power, but no 120V appliances work and no battery charging occurs.
Most Likely Causes: Tripped main breaker, bad power cord, or campground power issues.
Solution Steps: Test campground outlet with portable device, inspect RV power cord for damage, check and reset main RV breaker, test GFCI outlets.
BlackSeries Tip: Our surge protectors display error codes: check for reverse polarity or low voltage conditions that protect your electrical system.
Case B: 12V System Completely Dead But Battery Tests Good
Symptoms: Lights won’t turn on, water pump silent, but battery shows 12.6V at terminals.
Most Likely Causes: Blown main fuse, tripped battery disconnect, or bad ground connection.
Solution Steps: Check battery disconnect switch position, test main 12V fuse with multimeter, inspect ground connections at battery and frame.
BlackSeries Tip: Check auxiliary fuse boxes near the battery compartment: some systems have multiple fuse points that can cause total failure.
Case C: Solar Panels Show Zero Input During Sunny Day
Symptoms: Charge controller displays no solar input despite clear, sunny conditions.
Most Likely Causes: Disconnected panel wiring, failed charge controller, or completely shaded panels.
Solution Steps: Check panel connections for corrosion or loose MC4 connectors, test panel voltage output directly, inspect charge controller fuses.
BlackSeries Tip: Our roof-mounted panels rarely experience shading, so focus on electrical connections and charge controller settings first.
For off-grid power management strategies and solar system optimization, explore our Best Off Grid RV with Solar guide.
FAQ: RV Electrical Troubleshooting
Q: Why is my RV not getting power from shore power?
A: Check if the campground outlet is working, inspect your power cord for damage, and reset any tripped GFCI outlets or breakers in your RV’s electrical panel.
Q: How do I troubleshoot a dead 12V system?
A: Start by testing battery voltage, checking the main 12V fuse, verifying the battery disconnect switch is on, and inspecting ground connections for corrosion.
Q: What causes RV breakers to trip?
A: Circuit overload from running too many appliances simultaneously, faulty appliances drawing excessive current, or short circuits in wiring cause breaker trips.
Q: How long should an RV battery last?
A: Lead-acid batteries typically last 3-5 years with proper maintenance, while lithium batteries can last 10+ years. Usage patterns and maintenance quality significantly affect lifespan.
Q: Can I troubleshoot solar issues without special tools?
A: Basic diagnosis requires only visual inspection and checking charge controller displays, but voltage testing with a multimeter provides much more accurate diagnosis.
Q: Why is my inverter not working?
A: Common causes include low battery voltage, overload from too many appliances, overheating from blocked ventilation, or loose DC connections at the inverter input.
Electrical problems don’t have to end your adventure. With systematic troubleshooting and the right tools, most RV electrical issues can be diagnosed and resolved quickly. BlackSeries RVs are built for reliability, but understanding your electrical systems ensures you’re prepared for any situation the trail presents.
Ready to experience the confidence that comes with a professionally engineered electrical system? Visit our showroom to see how BlackSeries RVs deliver reliable power for your off-grid adventures.

