RV window leaks usually stem from aging sealant, loose installation, or frame warping: most cases can be fixed at home with proper resealing and correct installation techniques.
Discovering water dripping from your RV windows during a rainstorm can quickly turn your adventure into a nightmare. Window leaks are among the most common issues RV owners face, but the good news is that most leaks are preventable and fixable with the right knowledge and tools. Whether you’re dealing with minor seepage or significant water intrusion, understanding the causes and solutions will help you maintain a dry, comfortable living space.
Why RV Windows Leak in the First Place
Understanding why RV windows fail is crucial for both fixing current problems and preventing future ones. Unlike residential windows that remain stationary, RV windows endure constant movement, vibration, and extreme temperature changes that accelerate wear and tear.
Sealant aging and UV damage represent the primary culprit behind most window leaks. The rubber and silicone compounds used to seal RV windows gradually break down when exposed to intense sunlight, temperature fluctuations, and weather elements. UV rays cause these materials to become brittle and crack, while repeated expansion and contraction from temperature changes create gaps where water can penetrate.
Vibration and frame movement during travel constantly stress window seals. Every bump, turn, and mile traveled flexes the RV’s frame slightly, which can cause properly installed sealant to separate from window frames over time. This is particularly problematic in older RVs or those frequently used on rough terrain.
Improper installation during manufacturing or previous repairs often creates immediate or future leak points. Insufficient sealant coverage, incorrect material choices, or poor surface preparation can lead to premature seal failure. Unfortunately, some budget RV manufacturers cut corners during window installation, leaving owners to address these issues later.
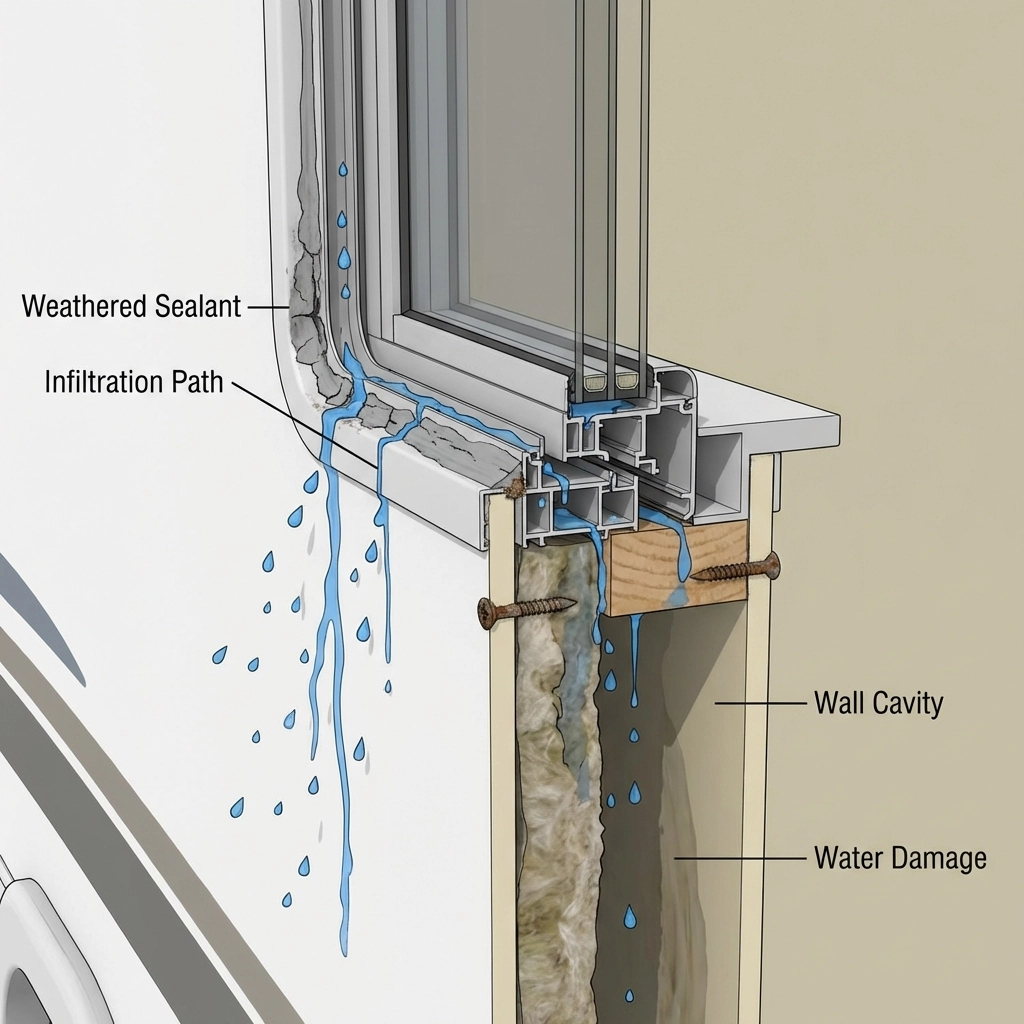
Water follows predictable intrusion paths around RV windows. It typically enters through gaps in the exterior sealant, travels along window frames, and emerges inside the RV at the lowest point: often far from the actual leak source. This makes identifying the exact problem area challenging without systematic inspection.
Signs You Have a Leaky RV Window
Early detection of window leaks can prevent thousands of dollars in structural damage. Water intrusion often starts small and gradually worsens, making regular inspection essential for any RV owner.
Water stains or soft wall panels around windows are obvious indicators of moisture problems. Look for discolored areas, peeling wallpaper, or walls that feel spongy when pressed. These signs often appear before visible water dripping becomes apparent.
Musty odors frequently develop when water becomes trapped behind wall panels or insulation. This smell indicates potential mold growth, which poses health risks and requires immediate attention. The odor may be strongest near windows or in enclosed areas where air circulation is limited.
Distinguishing between condensation and actual leaks is crucial for proper diagnosis. Condensation typically appears as uniform moisture across the entire window surface and occurs during specific weather conditions. Actual leaks create localized wet spots, often accompanied by water trails or drip marks.
Mold risk in hidden cavities represents a serious concern with window leaks. Water that penetrates wall assemblies can foster mold growth in areas you can’t easily see or clean. This hidden damage often requires extensive repair work and poses ongoing health risks if not addressed promptly.
How to Locate the Source of an RV Window Leak
Accurately identifying leak sources saves time and prevents unnecessary repairs. Many RV owners waste effort sealing the wrong areas because they fix where water appears rather than where it actually enters.
Start with a visual inspection checklist examining each window from both inside and outside the RV. Look for obvious gaps in sealant, cracked or missing material, or areas where sealant has pulled away from surfaces. Pay special attention to corners and bottom edges where water naturally accumulates.
The hose test method provides the most reliable way to locate leak sources. Starting at the bottom of the window, slowly spray water upward while someone inside watches for dripping. Work systematically up the window frame, allowing time for water to penetrate and travel to leak points.
Interior versus exterior indicators often point to different problems. Interior water stains below a window might indicate a leak above the visible stain, while exterior sealant gaps show where water likely enters. Understanding this relationship helps focus repair efforts on actual problem areas.
Why guessing causes repeat leaks: Without proper diagnosis, many repairs fail because they address symptoms rather than causes. Applying sealant over existing leaks or fixing the wrong location often provides only temporary relief and wastes valuable time and materials.
How to Fix a Leaky RV Window (Step-by-Step)
Properly resealing an RV window requires patience and attention to detail. Rushing through these steps or skipping surface preparation often leads to repeated failures within months.
Step 1 – Remove the Window Safely
Begin by carefully removing interior trim pieces that hold the window in place. Most RV windows use plastic trim rings that pop off or unscrew from the interior. Support the window from outside while removing fasteners to prevent it from falling. Have an assistant help with larger windows, as they can be heavier than expected.
Document the removal process with photos, showing screw locations and trim piece orientation. This documentation proves invaluable during reassembly, especially if several days pass between removal and reinstallation.

Step 2 – Clean Old Sealant and Surface
Remove all old butyl tape and sealant using a putty knife or specialized removal tool. This step requires patience: approximately 90% of proper sealant adhesion depends on thorough surface preparation. Avoid using sharp tools that might scratch or damage window frames.
Clean all surfaces with isopropyl alcohol or appropriate degreasing agent to remove residual oils, dirt, and sealant residue. Allow surfaces to dry completely before proceeding to the next step.
Step 3 – Apply New Sealant or Butyl Tape
Choose appropriate sealant based on your climate and window type. Butyl tape provides excellent flexibility for areas with temperature extremes, while lap sealants work well for permanent installations. Apply sealant in continuous beads, avoiding gaps that could allow water penetration.
Maintain consistent thickness throughout the application, typically 1/8 to 1/4 inch wide. Too little sealant creates weak spots, while excessive amounts can squeeze out during installation and create messy cleanup challenges.
Step 4 – Reinstall and Seal the Window
Position the window carefully and begin tightening screws gradually in a cross pattern. Avoid over-tightening, which can crack window frames or create uneven pressure that compromises the seal. Tighten screws until they’re snug, then add an additional quarter turn.
Apply exterior finishing sealant around the entire window perimeter, creating a smooth, professional appearance that sheds water effectively. Use appropriate RV-specific sealants that remain flexible in temperature extremes.
Best Sealants and Materials for RV Window Repair
Selecting appropriate sealant materials dramatically affects repair longevity and performance. Not all sealants are created equal, and using household products often leads to premature failure.
Butyl tape versus silicone versus lap sealant each serve different purposes in RV window repair. Butyl tape excels as a primary seal between window frames and RV walls, providing excellent flexibility and weather resistance. Silicone sealants work well for detailed areas but may not adhere properly to some RV materials. Lap sealants create durable exterior finishes that withstand UV exposure and weather extremes.
Avoid household caulk designed for indoor use, as it lacks the flexibility and weather resistance required for RV applications. These products often crack or fail within months when exposed to temperature cycling and road vibration.
Climate considerations should influence material selection. Hot climates require sealants with superior UV resistance, while cold climates need materials that remain flexible at low temperatures. Year-round travelers need products that perform across wide temperature ranges.
Common Mistakes When Fixing an RV Window Leak
Learning from others’ mistakes can save significant time and frustration during window repairs. These common errors often lead to repeated failures and additional expense.
Sealing over old sealant represents the most frequent mistake in RV window repair. While this approach seems faster, it virtually guarantees premature failure because new sealant can’t properly adhere to contaminated surfaces.
Over-tightening screws can crack plastic window frames or create uneven pressure that compromises seal integrity. This mistake is particularly common with enthusiastic DIYers who assume “tighter is better.”
Ignoring wall damage behind leaky windows often leads to repeated failures. Water damage in wall assemblies must be addressed before resealing, or the repair will fail as structural integrity continues to deteriorate.
Using incompatible materials such as household caulk or automotive sealants often provides only temporary fixes. These products lack the specific properties required for RV applications and may actually prevent proper repairs when they fail.
How to Prevent RV Window Leaks Long-Term
Proactive maintenance prevents most window leak problems and extends the life of your RV investment. Regular inspection and minor touch-ups cost far less than major repairs after water damage occurs.
Establish an inspection frequency that matches your usage patterns. Full-time travelers should inspect window seals monthly, while occasional users can inspect seasonally. Pay particular attention to seals after extreme weather events or rough travel conditions.
Storage considerations significantly impact window seal longevity. UV exposure during storage accelerates sealant degradation, making covered storage or UV-resistant sealants important for RVs stored outdoors. Proper ventilation during storage prevents condensation that can mask developing leak problems.
After off-road travel or rough terrain, inspect all window seals for signs of stress or movement. The constant flexing and vibration during off-road adventures can accelerate seal failure, particularly in older RVs or those with previous repairs.
Watch for early warning signs such as minor sealant cracking, small gaps, or slight discoloration around window frames. Addressing these issues early with minor touch-ups prevents major leak problems and expensive structural repairs.
At BlackSeries RV, our rugged travel trailers are designed with superior window installation and sealing techniques to withstand extreme off-road conditions. Our attention to detail in window mounting and weatherproofing reflects our commitment to keeping adventurers dry and comfortable in any environment.
FAQs About Fixing a Leaky RV Window
Can I reseal an RV window without removing it?
Minor touch-ups are possible without removal, but proper resealing requires complete window removal for thorough surface preparation. Attempting to seal over existing leaks often provides only temporary fixes.
What sealant is best for RV windows?
Butyl tape provides the best primary seal for most applications, while lap sealant works well for exterior finishing. Avoid household caulk and choose RV-specific products designed for temperature extremes and UV exposure.
How often should RV windows be resealed?
Inspect window seals every 6-12 months and reseal as needed based on condition rather than arbitrary schedules. Quality installations in moderate climates may last 5-10 years, while harsh conditions or heavy use may require more frequent attention.
Is a leaky RV window dangerous?
While not immediately dangerous, window leaks can cause extensive structural damage, mold growth, and create unsafe living conditions if ignored. Address leaks promptly to prevent expensive repairs and health hazards.

