Your cart (0)
Your cart is empty
Tax included and shipping calculated at checkout
Your cart is empty
Tax included and shipping calculated at checkout

Solar power isn’t a luxury anymore, it’s the heartbeat of the modern off-road lifestyle. For adventurers pushing into remote territories where the grid is just a memory, a robust solar setup transforms your travel trailer from a mobile bedroom into a self-sustaining basecamp. Whether you’re hauling a compact rig in the 16 ft camper weight class or commanding a beast in the 30 foot rv weight category, solar power gives you the freedom to stay out longer, explore deeper, and camp without compromise.
At BlackSeries, we engineer our trailers for extreme remote exploration. That means every electrical system, every battery mount, and every roof rack is designed with solar integration in mind. This guide breaks down everything you need to know about going solar in 2026, from choosing components to wiring your system and maximizing your off-grid independence.
Energy independence is the goal. No generator roar at 6 AM. No frantic searches for campground hookups. No fuel runs cutting into your adventure time. Solar power delivers silent, renewable energy that keeps your fridge cold, your lights on, and your devices charged, all while leaving a smaller environmental footprint.
For BlackSeries owners whose rigs are built to access terrain that traditional RVs can’t touch, solar isn’t optional. It’s the difference between a three-day weekend and a three-week expedition. The heavier your rig, whether you’re in the 30 ft camper weight range or managing a nimble 18 ft camper weight model, the more battery capacity you can carry, which means more stored solar energy for extended stays.
Modern lithium battery technology has changed the game entirely. You can now run an air conditioner, power tools, and even a Starlink satellite internet system completely off-grid. That’s not camping, that’s establishing a remote headquarters.
A functional solar setup has four core elements that work together seamlessly. Skip one, and your system won’t perform. Cheap out on quality, and you’ll be troubleshooting in the wilderness.
Monocrystalline panels are the efficiency kings. They convert more sunlight into usable electricity per square foot than polycrystalline alternatives, which matters when roof space is limited, especially on smaller rigs like the 16 ft camper weight trailers where every inch counts.
For BlackSeries setups, we recommend 1,200+ watts of total solar capacity for serious off-grid work. That typically means six 200-watt panels mounted on the roof. Newer 2026 models feature higher-efficiency cells that maintain performance even in partial shade or lower light conditions.
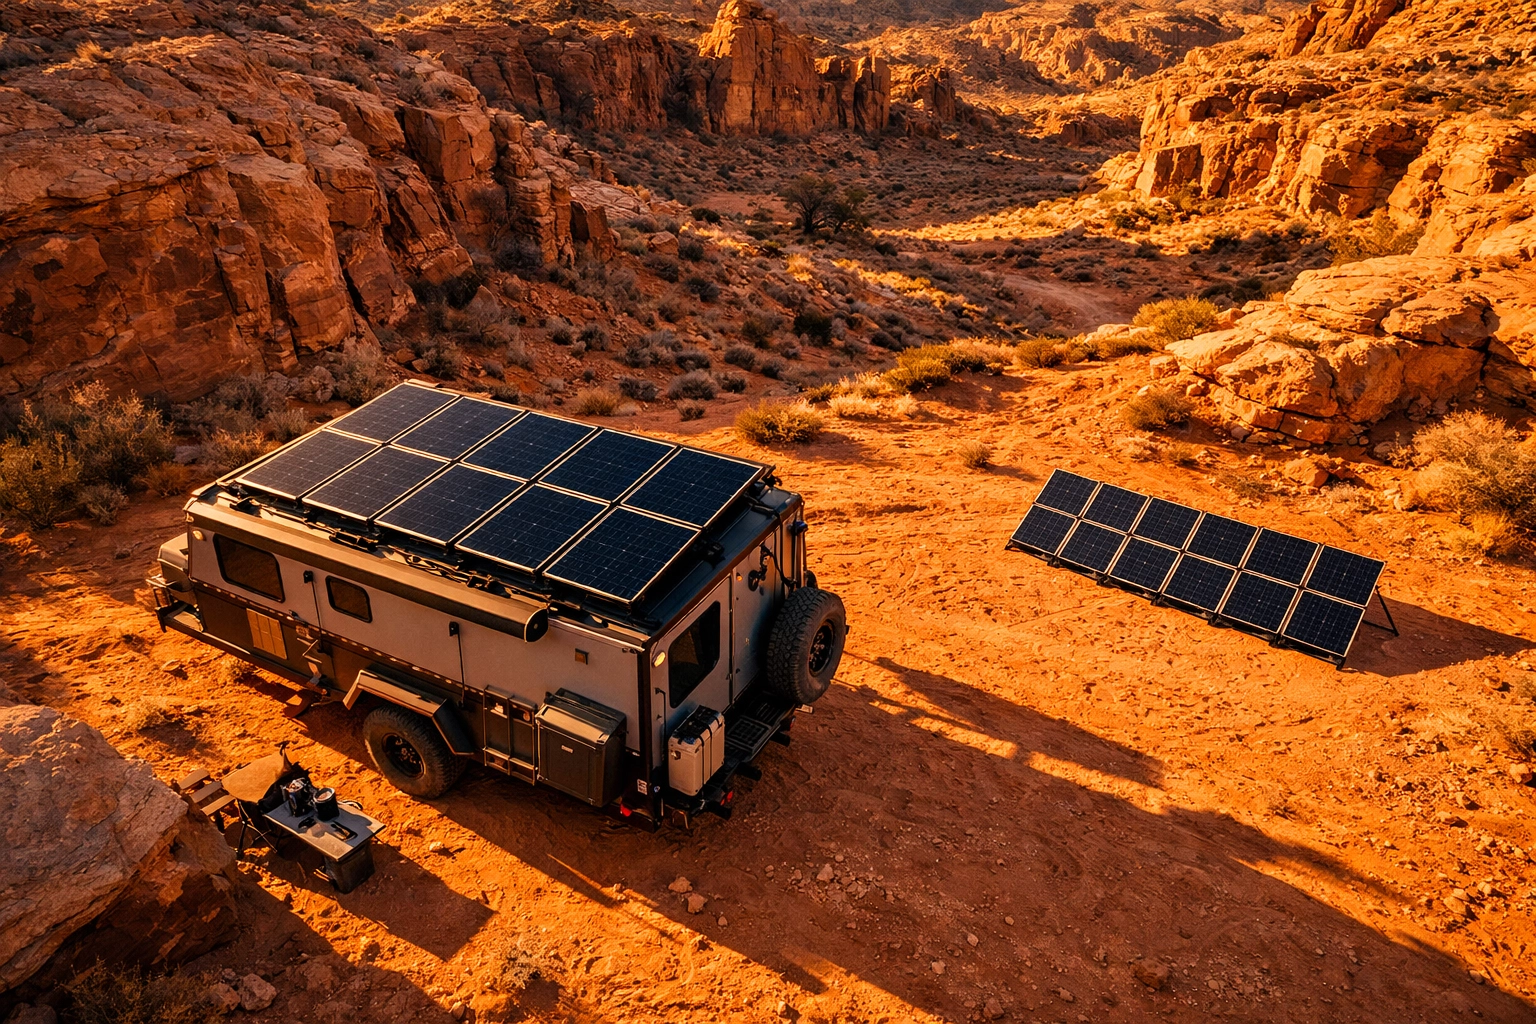
Fixed rooftop panels are the workhorse. They generate power all day without setup, and they’re engineered to survive the intense vibration and jarring that comes with off-road trailer travels. The downside? If you park under trees or in shadow, you can’t reposition them.
Portable solar panels solve the shade problem. Deploy them 20 feet away in full sun while your trailer sits in the shade. They’re perfect for supplementing fixed arrays or as the primary system for lighter rigs. Just remember: portable panels need integrated controllers since they won’t route through your main system.
The charge controller is the brain of your solar system. It regulates voltage and current from your panels to prevent battery overcharging and maximize energy harvest.
MPPT (Maximum Power Point Tracking) controllers are the only option worth considering for BlackSeries setups. They’re 20-30% more efficient than older PWM controllers, especially during low-light conditions or when your battery is deeply discharged. For a rig in the 24 ft camper weight range carrying 400+ amp-hours of battery, that efficiency gain translates to hours of additional runtime.
This is where your investment matters most. Lithium Iron Phosphate (LiFePO4) batteries are the superior choice for off-grid travel in 2026, and here’s why:
BlackSeries recommends 200-400 amp-hour (Ah) lithium banks for most applications. A 300Ah system paired with 1,200 watts of solar gives you genuine multi-week independence. Yes, lithium costs more upfront: but the performance, reliability, and longevity make it a non-negotiable upgrade for serious adventurers.
Traditional AGM and gel batteries remain viable for budget builds, but they’re heavier and provide less usable power. For an off-road camper designed to conquer extreme terrain, every pound matters.

Your batteries store DC (direct current) power, but most RV appliances run on AC (alternating current). That’s where the inverter comes in.
For BlackSeries setups, we spec 2,000-3,000 watt pure sine wave inverters. This capacity handles high-draw appliances like air conditioners, microwaves, and power tools. Pure sine wave output protects sensitive electronics like laptops and medical devices from damage.
Size your inverter based on your peak draw. Running a 13,500 BTU air conditioner requires roughly 1,800 watts when running (more for startup surge), so a 2,500W inverter provides comfortable headroom.
Building a solar system isn’t rocket science, but attention to detail separates a reliable setup from a frustrating nightmare. Here’s how to do it right.
Before you buy a single component, calculate your daily power consumption. List every electrical device you’ll use and its wattage:
Multiply each item’s wattage by hours of daily use, then add everything up. This gives you your total watt-hours per day. Add a 20% buffer for inefficiency and cloudy days.
For most BlackSeries owners, 2,000-3,500 watt-hours per day is realistic when you’re running lights, fridge, fans, and charging devices. Add air conditioning, and you’re looking at 5,000+ watt-hours.
Based on your power needs, select components that work together:
For heavier rigs in the 30-foot camper weight category, the chassis can handle larger battery banks (500+ Ah), which extends your off-grid endurance even further.

Rooftop mounting is standard for trailers in the 24 ft camper weight range and larger. Panels mount to aluminum rails or brackets that distribute stress across the roof structure. BlackSeries roofs are engineered to handle the weight and wind resistance of full solar arrays without compromise.
Key considerations:
Portable/suitcase panels work beautifully for smaller rigs like 16 ft camper weight models where roof space is limited. They also supplement fixed arrays when you need extra juice. Position them in full sun, adjust the angle throughout the day, and pack them away when you move camp.
Electrical wiring must handle the current without voltage drop or fire risk. Use appropriately sized wire (typically 6-10 AWG for solar, 4-6 AWG for inverter connections) and protect every circuit with proper fusing.
Critical wiring steps:
The heavy-duty BlackSeries chassis wiring is designed to handle high-amp solar systems without the voltage sag that plagues cheaper trailers. Our factory harnesses route cleanly and include proper strain relief: critical when you’re bouncing down washboard roads.
Once everything is wired, test the system before you hit the trail:
Use a multimeter to verify voltage at each connection point. Voltage drop indicates resistance: usually from loose connections or undersized wire.
You have two paths to solar power: factory-integrated systems designed specifically for your trailer, or custom DIY installations.
Our HQ series trailers offer factory-installed solar packages designed for the punishment of off-road travel. These aren’t generic RV systems bolted on as an afterthought: they’re engineered into the trailer from day one.
Advantages:
The BlackSeries factory solar package typically includes six 200W panels (1,200W total), a 60A MPPT controller, 300-400Ah lithium battery bank, and a 3,000W inverter. This setup provides genuine multi-week off-grid capability for most users.
Building your own system gives you complete control over components and configuration. This route works well if you have specific power requirements or want to maximize your budget.
Considerations:
For lighter trailers where average travel trailer weights allow limited battery capacity, a smaller DIY system (600-800W panels, 200Ah battery) can be sufficient for basic needs.

Modern 2026 systems include DC-to-DC battery chargers that safely charge your lithium batteries from your tow vehicle’s alternator while traveling. This is a game-changer for BlackSeries owners who cover serious miles between campsites.
Benefits:
Best practice: Avoid running high-draw electronics (like inverters powering air conditioning) while DC-to-DC charging is active: you risk overloading your vehicle’s alternator.
Solar systems are low-maintenance, but they’re not zero-maintenance. A few simple practices keep everything running reliably.
Panel cleaning: Dust, pollen, bird droppings, and road grime reduce efficiency. Clean panels monthly (more often in dusty environments) with water and a soft brush. Never use abrasive cleaners.
Connection inspection: Check all wiring connections quarterly for corrosion, looseness, or damage. Vibration from off-road travel can work connections loose over time: this is why we use marine-grade terminals and strain relief.
Battery health monitoring: Most lithium systems include Bluetooth monitoring. Check cell voltages regularly to ensure balanced charging. Significant variance between cells indicates a problem.
Charge controller settings: Verify your controller is programmed for your specific battery chemistry. Incorrect settings damage batteries and reduce lifespan.
Panels not charging: Check for loose connections, blown fuses, or shading on the panels. Verify the controller displays incoming voltage from the array.
Battery not holding charge: This could indicate failing batteries, parasitic draws from appliances left on, or incorrect charging parameters. Use a multimeter to check voltage under load.
Inverter problems: If the inverter won’t turn on, check battery voltage (needs 12.5V minimum for most units) and verify all connections are tight. Persistent overload shutdowns mean you’re exceeding inverter capacity: upgrade or reduce load.
Solar power requires upfront investment, but the long-term returns are substantial: especially if you boondock frequently.
A complete factory-installed BlackSeries solar package runs $8,000-12,000 depending on capacity. DIY systems range from $3,000-8,000 based on component quality and capacity.
Component breakdown:
The ROI calculation is straightforward. If you camp 60 nights per year and pay $40 average per night for hookups, that’s $2,400 annually. A solar system pays for itself in 3-5 years: then keeps delivering free power for another 15-20 years.
Additional value:
Deploy portable panels strategically: Position them in full sun away from shade cast by your trailer or nearby trees. Adjust angle 2-3 times per day to track the sun for maximum harvest.
Manage high-draw appliances: Run your air conditioner during peak solar production hours (10 AM – 3 PM) when panels are generating maximum power. This uses solar directly rather than depleting batteries.
Monitor weather patterns: Cloud cover reduces output by 60-80%. Plan high-consumption activities for sunny periods.
Use lithium heating in cold weather: If camping in freezing temperatures, ensure your batteries have integrated heating systems. Lithium batteries won’t accept charge below 32°F without heating.

How many solar panels do I need for a 18 ft camper weight trailer?
For basic off-grid capability (lights, fridge, charging devices), 400-600 watts is minimum. For air conditioning and extended stays, upgrade to 1,000-1,200 watts. The smaller roof area on an 18-footer might limit you to 3-4 panels, so prioritize efficiency.
Can solar power run my RV air conditioner?
Yes: with sufficient capacity. A 13,500 BTU AC unit draws 1,500-1,800 watts running (2,500+ watts at startup). You need at least 1,200 watts of solar and 300+ Ah of lithium batteries to run AC for extended periods. Expect 4-6 hours of AC runtime on a sunny day with this setup.
Is solar worth it for smaller trailers like a 16 ft camper weight model?
Absolutely. Even compact rigs benefit from solar independence. A scaled system (400-800W panels, 200Ah battery) provides lights, fridge, and device charging indefinitely. You might not run air conditioning all day, but you’ll never worry about dead batteries at a remote campsite.
What happens on cloudy days?
Solar output drops 60-80% in overcast conditions. This is why battery capacity matters: you’re drawing stored energy when panels aren’t generating. Size your battery bank for 2-3 days of autonomy to ride out weather.
How long does installation take?
Professional installation takes 1-2 days for a complete system. DIY installations take 2-4 days depending on experience level and complexity. Factor in additional time for testing and troubleshooting.
Do I need to upgrade my tow vehicle’s electrical system?
Only if adding DC-to-DC charging. The trailer’s solar system operates independently. However, ensure your vehicle’s trailer plug wiring can handle the amperage if you’re charging batteries while towing.
Solar power isn’t just an upgrade: it’s the key to unlocking true off-grid independence. For BlackSeries owners who push into remote territory where average weight of camper regulations and terrain challenges weed out casual adventurers, a robust solar system is what separates a weekend warrior from a serious explorer.
The 2026 solar technology landscape offers unprecedented efficiency, reliability, and ease of use. Lithium batteries store more power in less space. MPPT controllers squeeze every watt from your panels. Modern inverters power household appliances silently and efficiently.
Whether you’re commanding a full-size rig in the 30 ft rv weight class or navigating tight trails with a nimble off-road travel trailer, solar power gives you the freedom to stay out longer, camp wherever you want, and experience the wilderness on your terms.
Ready to go solar? Check out the factory-installed solar power options on our latest HQ series trailers. Every BlackSeries rig is engineered from day one for serious off-grid capability: and our solar integration packages are designed to work flawlessly with the heavy-duty electrical systems, reinforced roofs, and rugged chassis that define our trailers.
The sun rises every morning. Make sure your power does too.