What is winterizing a travel trailer? Winterizing is the process of protecting your RV’s water system from freezing temperatures by draining all water lines and adding antifreeze to prevent costly damage from burst pipes, mold growth, and system corrosion.
Winter can wreak havoc on unprepared travel trailers. Frozen pipes can burst, causing thousands in damage. Water left in tanks breeds mold and bacteria. Metal components corrode from moisture buildup. Even premium off-road trailers like BlackSeries models, built with superior weatherproofing and all-terrain durability, require proper winterizing to maintain their legendary reliability.
Whether you’re storing your trailer for the season or planning winter camping adventures, this comprehensive guide covers everything from basic winterizing steps to advanced off-grid preparation techniques.
What You Need Before Winterizing Your Travel Trailer
Proper preparation prevents headaches later. Here’s your essential winterizing toolkit:
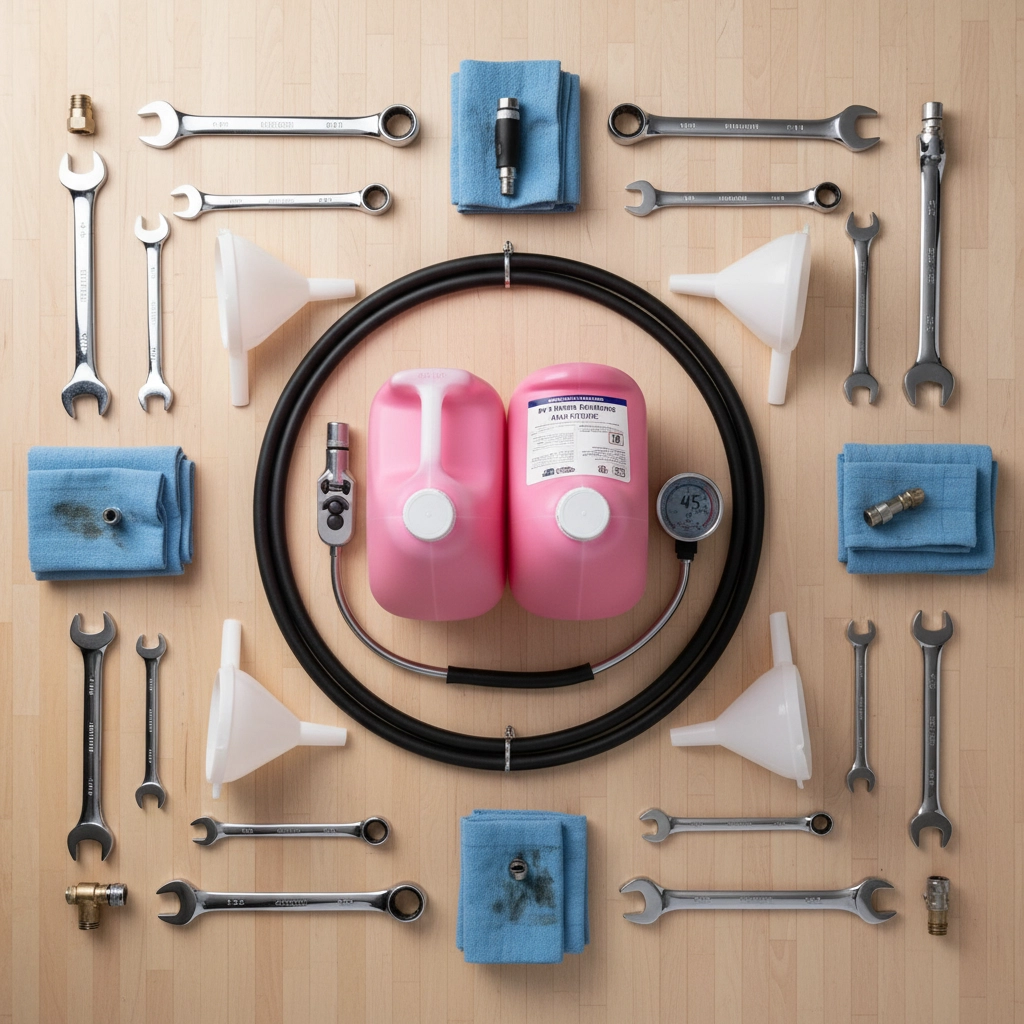
Required Tools & Supplies:
- 2-4 gallons of RV-approved pink antifreeze (non-toxic propylene glycol)
- Water heater bypass kit (if not factory-installed)
- Air compressor or water pump converter kit
- Socket wrench set
- Water pressure regulator
- Funnel and measuring cup
- Shop towels and buckets
BlackSeries Advantage: BlackSeries trailers come equipped with premium plumbing components and thoughtful system layouts that make winterizing more straightforward. Many models include factory-installed bypass valves and accessible drain points designed for easier maintenance.
Pro Tip: Download our printable winterizing checklist to ensure you never miss a step. Having a systematic approach prevents costly oversights that could damage your investment.
Step-by-Step Guide: How to Winterize a Travel Trailer for Beginners
Follow this proven process used by RV technicians nationwide:
Step 1: Drain the Water System Completely
Start by draining all holding tanks at an appropriate dump station. Empty your fresh water tank using the tank drain valve, typically located on the trailer’s underside. Open your gray and black tank valves completely, then close them once empty.
Why this matters: Any residual water will freeze and expand, potentially cracking tanks or splitting seams.
Step 2: Bypass and Drain the Water Heater
Turn off your water heater’s power source (electric or gas). Locate the bypass valves, usually three valves near the water heater. Close the inlet and outlet valves, then open the bypass valve. Remove the drain plug and pressure relief valve to drain completely.
Critical warning: Never put antifreeze directly into your water heater. The bypass system routes antifreeze around the heater, not through it.
Step 3: Protect Plumbing Lines with RV Antifreeze
Install your water pump converter kit if your trailer doesn’t have one. Place the pickup tube into a gallon of RV antifreeze. Turn on your water pump and begin at the faucet closest to the pump.
Open both hot and cold taps until pink antifreeze flows steadily. Repeat this process at every faucet, shower, and water outlet. Don’t forget exterior shower connections and toilet flush valves.
BlackSeries Plumbing Advantage: BlackSeries trailers feature strategically designed water line routing that minimizes low points where water can collect, making the antifreeze process more efficient and thorough.
Step 4: Interior Preparation
Pour one cup of antifreeze down each drain and into toilet bowls to protect P-traps. Clean and organize interior spaces, removing any items that could freeze or attract pests. Use moisture absorbers in cabinets and storage areas.
Step 5: Exterior Protection
Inspect your roof seals and caulking, winter weather will find any weak spots. Clean gutters and ensure proper drainage.
BlackSeries Durability: The aluminum construction and premium gel-coat finish on BlackSeries trailers provide superior weather resistance, but proper preparation extends this protection even further.

Step 6: Battery, Tires & Electronics Management
Disconnect your battery and store it in a temperature-controlled environment, maintaining charge between 12.4-12.7 volts. Check tire pressure and consider using tire covers to prevent UV damage and flat spots.
Turn off your propane supply at the tanks and ensure all gas appliances are properly shut down.
Travel Trailer Winterizing Checklist
Print this checklist and keep it with your maintenance records:
Water System:
- ☐ Drain fresh, gray, and black tanks
- ☐ Drain water heater (bypass installed)
- ☐ Open low-point drain valves
- ☐ Run antifreeze through all faucets
- ☐ Flush toilet with antifreeze
- ☐ Treat city water inlet
- ☐ Pour antifreeze in all drains/P-traps
Interior Preparation:
- ☐ Remove perishables and liquids
- ☐ Clean all surfaces thoroughly
- ☐ Place moisture absorbers
- ☐ Secure loose items
- ☐ Leave cabinet doors slightly open
Exterior & Systems:
- ☐ Inspect and seal roof/caulking
- ☐ Clean and lubricate slide-outs
- ☐ Cover or remove battery
- ☐ Check tire pressure
- ☐ Turn off propane at tanks
- ☐ Install RV cover (optional)
Cost Guide: How Much Does It Cost to Winterize a Travel Trailer?
Understanding winterizing costs helps you budget appropriately:
DIY Winterizing Cost: $40-$120
Basic supplies needed:
- RV Antifreeze (2-4 gallons): $20-$40
- Winterizing kit/pump converter: $15-$30
- Miscellaneous supplies: $5-$15
- Time investment: 90-120 minutes
Premium approach: $80-$120
- Higher-grade antifreeze
- Professional-grade tools
- Additional protective products
Professional Service Cost: $150-$300
Professional winterizing varies by region and service level:
- Basic service: $150-$200
- Premium service: $200-$300
- Includes: Complete system flush, antifreeze, inspection, minor repairs
Regional variations: Northern states typically charge 15-25% more due to higher demand and stricter requirements.
Best Winterizing Kits & Recommended Products for Travel Trailers
Top RV Antifreeze Options
Best Overall: Camco RV Premium Antifreeze
- Non-toxic propylene glycol formula
- -50°F burst protection
- Safe for all RV plumbing systems
Budget Choice: Splash RV Antifreeze
- Reliable freeze protection
- Widely available
- Good value for basic needs
Complete Winterizing Kits
Camco Winterizing Kit: Includes pump converter, antifreeze, and hand pump – perfect for beginners.
Valterra Winterizing Kit: Professional-grade components with detailed instructions.
Where to buy: Amazon, Camping World, and local RV dealers offer competitive pricing and seasonal sales.
Common Mistakes to Avoid When Winterizing
Mistake #1: Forgetting the Water Heater Bypass
This is the most expensive error. Always bypass your water heater before adding antifreeze.
Mistake #2: Incomplete Drainage
Rushing through drainage leaves water in low points where it can freeze and cause damage.
Mistake #3: Using Wrong Antifreeze
Only use RV-specific antifreeze. Automotive antifreeze is toxic and will damage seals.
Mistake #4: Ignoring Exterior Components
Don’t forget exterior shower connections, wash stations, and ice maker lines.
Mistake #5: Battery Neglect
A frozen battery is a dead battery. Always remove and store in a warm location.
Frequently Asked Questions
Q: Do I really need to winterize my travel trailer?
Yes, if temperatures in your storage area will drop below 32°F for extended periods. Even one freeze cycle can cause significant damage to unprotected plumbing systems.
Q: Can I winterize without using antifreeze?
Yes, using the “dry” method with compressed air to blow out all water lines. However, the antifreeze method provides better protection and is recommended for most users.
Q: How long does the winterizing process take?
Most owners complete winterizing in 60-90 minutes once familiar with their system. First-time winterizing may take 2-3 hours.
Q: What temperature should trigger winterizing?
Begin winterizing when overnight temperatures consistently drop below 40°F, well before the first hard freeze.
Q: How do I dewinterize in spring?
Reverse the process: drain antifreeze, restore normal valve positions, sanitize the system with bleach solution, and test all components before your first trip.
Proper winterizing protects your investment and ensures your BlackSeries trailer is ready for next season’s adventures. Whether you’re planning winter storage or cold-weather camping, following these steps prevents costly repairs and maintains your trailer’s legendary reliability.
For additional maintenance tips and off-road camping guides, visit our comprehensive blog for expert advice tailored to adventure-ready travelers.

