Winter RVing presents unique challenges that can make or break your cold-weather camping experience. While your BlackSeries RV is built tough for off-road adventures, even the most rugged travel trailers face heat loss through their windows during freezing temperatures. Proper window insulation isn’t just about comfort, it’s about energy efficiency, cost savings, and creating a warm sanctuary in the wilderness.
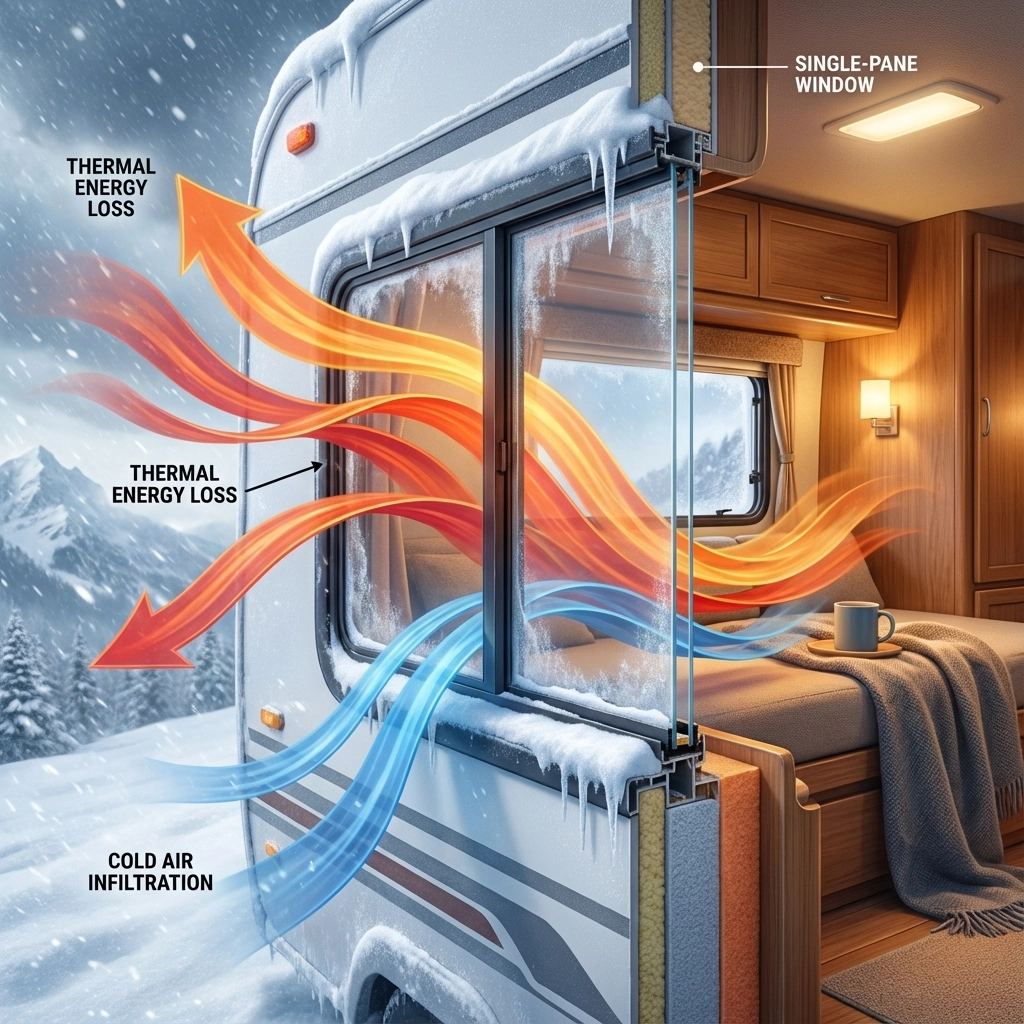
RV windows are notorious weak points in your rig’s thermal envelope. Unlike residential homes with thick walls and double-pane windows, RVs typically feature single-pane glass set in thin aluminum frames that conduct cold efficiently. This means your heating system works overtime, draining your battery faster and potentially leaving you uncomfortable during those crisp winter nights.
This comprehensive guide will walk you through proven methods to insulate your RV windows effectively, from budget-friendly DIY solutions to professional-grade upgrades that keep you cozy during extended winter camping trips.
Why Insulating RV Windows is Critical for Winter Camping
Heat Loss Prevention: Your Biggest Energy Drain
Windows account for up to 30% of heat loss in a typical RV, making them the primary culprit behind skyrocketing heating costs and uncomfortable temperature fluctuations. Single-pane RV windows provide minimal thermal resistance, essentially acting as cold bridges that transfer exterior temperatures directly into your living space.
The physics are straightforward: heat naturally flows from warm to cold areas. Without proper insulation, your expensive propane or electric heating constantly battles the cold glass surfaces, creating drafts and cold spots that make your RV feel larger and harder to heat than it actually is.
Energy Efficiency: Slash Your Heating Costs
Proper window insulation can reduce your heating costs by 20-50%, depending on your RV size and local winter conditions. For full-time RVers or extended winter campers, this translates to significant savings on propane, electricity, and generator fuel throughout the season.
Consider this: if you’re spending $150 monthly on propane during winter months, effective window insulation could save you $30-75 per month. Over a four-month winter season, that’s $120-300 in savings, enough to pay for quality insulation materials several times over.
Improved Comfort: Consistent Temperature Throughout
Beyond cost savings, insulated windows eliminate cold drafts and temperature variations that make certain areas of your RV uncomfortable. No more huddling around the heater or dealing with condensation that fogs your view and potentially causes mold issues.
Types of Window Insulation for RVs
Window Insulation Film: Budget-Friendly Heat Barrier
How it works: Clear plastic film creates an insulating air pocket when properly installed over window glass. The film shrinks tight when heated with a hair dryer, forming an invisible secondary barrier.
Pros: Extremely affordable ($10-20 per RV), maintains visibility, removable without residue, and available at most hardware stores.
Cons: Can tear easily, may not withstand extended use, and provides moderate insulation compared to other methods.
Reflective Insulation (Reflectix): The Popular Choice
Reflectix consists of bubble wrap sandwiched between aluminum foil layers, creating both radiant heat reflection and insulating air pockets. This method has become the gold standard for RV window insulation due to its effectiveness and ease of use.
How it works: The reflective surface bounces radiant heat back into your RV while the bubble layer provides thermal resistance. In winter, install with the reflective surface facing inward to retain interior heat.
Pros: Affordable ($90-125 for a 30-foot RV), reusable for multiple seasons, easy installation with Velcro or adhesive, and excellent thermal performance.
Cons: Completely blocks visibility and natural light, giving your RV a “closed-in” feeling during daylight hours.

Thermal Curtains and Blinds: Style Meets Function
Specialized thermal curtains feature multiple layers designed to trap air and reduce heat transfer. Unlike regular curtains, these use materials specifically chosen for their insulating properties.
How they work: Dense fabric layers create dead air spaces that slow heat transfer. Many feature reflective backing or thermal lining that enhances their effectiveness.
Pros: Attractive appearance, easy to install, allows light control throughout the day, and provides privacy.
Cons: Less effective than dedicated insulation methods, higher cost for quality materials, and may not seal completely around window edges.
Insulated Window Covers: Maximum Protection
Custom-fit insulated covers slip directly over your RV windows, providing excellent thermal protection with a professional appearance. These covers typically use rigid foam or multiple insulation layers for superior performance.
How they work: Precisely cut covers fit snugly into window frames, eliminating air gaps while providing substantial thermal resistance.
Pros: Excellent insulation value, professional appearance, custom fit eliminates gaps, and durable for long-term use.
Cons: Higher initial cost ($50-150 per window), requires accurate measurements, and completely blocks light and views.
Step-by-Step DIY Window Insulation Methods
Step 1: Measure Your Windows Accurately
Start by measuring each window’s interior dimensions, noting any obstructions like latches, cranks, or trim pieces. RV windows vary significantly between manufacturers and models, so measure each one individually rather than assuming they’re identical.
Record width, height, and depth measurements for each window. Add 1-2 inches to your measurements when cutting reflective insulation for a snug fit, but cut rigid foam precisely to fit flush within the frame.
Step 2: Install Reflective Insulation (Reflectix Method)
Clean your window frames thoroughly, removing dirt, old adhesive residue, and moisture. Cut Reflectix pieces slightly oversized to ensure complete coverage without gaps.
Create approximately ¾ inch of dead air space between your insulation and the window glass, this air pocket significantly boosts thermal performance. Use small foam spacers or create a shallow frame to maintain consistent spacing.
Attach using industrial-strength Velcro strips for removable installation, or use double-sided tape for temporary mounting. Apply the tape to the window frame first, then carefully position your cut insulation pieces.
Critical tip: Install with reflective surfaces facing inward during winter to reflect interior heat back into your RV.
Step 3: Apply Window Insulation Film
For maximum effectiveness, combine film with other methods or use it on windows where you need occasional visibility. Start by cleaning both interior and exterior glass surfaces completely.
Apply the film to the interior window frame using the provided double-sided tape. Ensure the film is taut but not overstretched. Use a hair dryer on medium heat to shrink the film, creating a tight, wrinkle-free surface that forms an insulating air gap.
Step 4: Add Thermal Curtains or Blinds
Install thermal curtains or blinds that extend beyond the window frame to trap air effectively. Look for curtains with thermal backing or multiple layers specifically designed for insulation.
Mount brackets 2-4 inches beyond the window frame to create additional dead air space. Ensure curtains seal against the wall at the bottom and sides to prevent air circulation that reduces effectiveness.
Step 5: Custom-Fit Insulated Covers Installation
For the ultimate protection, create custom covers using rigid foam board cut to exact window dimensions. Use a sharp utility knife and straightedge for clean cuts.
Test-fit each piece before final installation. Covers should fit snugly without forcing, which could damage window frames or create gaps. Use compression fittings or removable fasteners that don’t permanently modify your RV.
Best Products for Insulating RV Windows
Reflectix: The Industry Standard
Available at most home improvement stores, Reflectix offers the best balance of cost, effectiveness, and ease of installation. A 25-foot roll typically covers 4-6 average RV windows and costs under $50.
Insulated Window Covers
Polar Bear Window Covers provide custom-fit options for many RV manufacturers, offering superior insulation with professional appearance. Expect to pay $75-150 per window, but the performance justifies the cost for serious winter campers.
Generic foam board covers offer a budget alternative. Purchase ½-inch or ¾-inch rigid foam insulation from home improvement stores and cut to size. Total cost typically runs $20-40 per window.
Thermal Curtains
Eclipse Thermal Curtains and Deconovo Blackout Curtains offer good insulation properties at reasonable prices ($15-35 per window). Look for curtains labeled specifically as “thermal” rather than just “blackout.”
How to Maximize Heat Retention
Check for Gaps and Air Leaks
Even the best insulation fails if air can circulate around it. Use weatherstripping around window edges to seal gaps between the frame and your RV’s wall. Pay special attention to corners where gaps commonly occur.
Test for air leaks using a candle or incense stick on windy days. Moving flame or smoke indicates air movement that reduces insulation effectiveness.
Seal All Penetrations
Don’t overlook small gaps around window latches, cranks, or mounting hardware. Use removable caulk or foam gaskets to seal these areas without permanent modifications.
Layer Your Insulation Methods
Combining techniques maximizes effectiveness. For example, use reflective insulation with thermal curtains simultaneously. The insulation provides the primary thermal barrier while curtains add an additional air gap and aesthetic appeal.
Consider using window film under other insulation methods for windows you occasionally need to uncover. This provides baseline protection even when primary insulation is removed.
Common Mistakes That Reduce Effectiveness
Not Sealing All Gaps
The most common error is focusing on the window glass while ignoring air leaks around the frame. Even small gaps drastically reduce insulation performance by allowing cold air infiltration and warm air escape.
Overcrowding with Insulation
While layering can help, using too much insulation can restrict necessary airflow for humidity control. This leads to condensation problems that create mold and mildew issues.
Using Non-Specific Products
Automotive insulation or materials not designed for RV applications can cause condensation buildup between layers. This moisture leads to mold growth and can damage your RV’s interior over time.
Incorrect Seasonal Orientation
Many RVers install reflective insulation backwards for the season. In winter, reflective surfaces should face inward to reflect heat back into your living space. Summer installation should have reflective surfaces facing outward to deflect solar radiation.
Frequently Asked Questions
Q: Can I insulate my RV windows without blocking all natural light?
A: Yes, several options maintain visibility while providing insulation. Clear window film adds a thermal barrier with minimal impact on light transmission. You can also use thermal curtains that open during the day or install covers with removable sections for occasional viewing.
Q: How much will proper window insulation help with heating costs?
A: Effective window insulation typically reduces heating costs by 20-50% depending on your RV size, insulation quality, and local weather conditions. For a typical winter camping scenario, this translates to $30-75 monthly savings on propane or electricity costs.
Q: How do I remove window insulation when spring arrives?
A: Most temporary insulation methods remove easily without residue. Velcro attachments peel off cleanly, window film peels away from frames, and thermal curtains simply unhook from their mounting hardware. Clean any remaining adhesive residue with adhesive remover or warm soapy water.
Q: Will insulating windows cause condensation problems?
A: Properly installed insulation actually reduces condensation by keeping interior surfaces warmer. However, ensure adequate ventilation and avoid over-insulating, which can trap moisture. Use a small fan or crack a roof vent slightly to maintain air circulation.
Q: Can I use automotive window tinting or insulation products?
A: Avoid automotive products not specifically designed for RV applications. These materials may not provide appropriate thermal properties and can cause condensation issues. RV-specific products are formulated for the unique challenges of travel trailer environments.
Conclusion
Insulating your RV windows transforms winter camping from an endurance test into a comfortable adventure. Whether you choose budget-friendly reflective insulation, professional-grade custom covers, or a combination approach, proper window insulation pays dividends in comfort, energy savings, and extended camping seasons.
The key is matching your insulation method to your camping style and budget. Weekend warriors might prefer removable film and thermal curtains, while full-time RVers benefit from investing in custom covers and comprehensive sealing systems.
Remember that your BlackSeries RV is built for adventure in any season. With proper window insulation, you can confidently explore winter destinations knowing you’ll stay warm and comfortable no matter what nature throws your way. For more winter preparation tips, check out our comprehensive 2025 off-road travel trailer buying guide to ensure your rig is ready for four-season adventures.
Start preparing your windows now, before the first frost hits. Your future self will thank you when you’re staying cozy in sub-freezing temperatures while others are shivering in poorly insulated rigs.

