Your cart (0)
Your cart is empty
Tax included and shipping calculated at checkout
Your cart is empty
Tax included and shipping calculated at checkout

An RV toilet is a specialized sanitation system designed for recreational vehicles, engineered to handle the unique challenges of mobile living. Unlike residential toilets, RV toilets must be lightweight, water-efficient, and capable of withstanding road vibrations and temperature extremes.
The core components include a bowl (ceramic or plastic), flush mechanism (foot pedal or hand lever), and connection to either a black water holding tank or self-contained waste system. Modern RV toilets use significantly less water per flush, typically 0.5 to 1 gallon compared to 1.6-3 gallons for home toilets.
The gravity-flush toilet represents the most popular choice among American RV owners, found in over 80% of travel trailers and motorhomes. These toilets operate similarly to home systems but with crucial modifications for mobile use.
Key Features:
Advantages:
Disadvantages:
Best Use Cases: Full-time RVers, families with children, and campers who frequent campgrounds with full hookups. The gravity-flush system works particularly well for off-road adventures where rugged construction meets comfort needs.
Composting toilets have surged in popularity among American boondockers, with searches increasing 150% since 2023. These waterless systems break down waste naturally using beneficial bacteria, ventilation, and organic matter.
How It Works:
Advantages:
Disadvantages:
Popular Models:
Cassette toilets bridge the gap between portability and permanent installation. Common in European RVs and increasingly popular among American van lifers, these systems feature removable waste tanks.
Advantages:
Disadvantages:
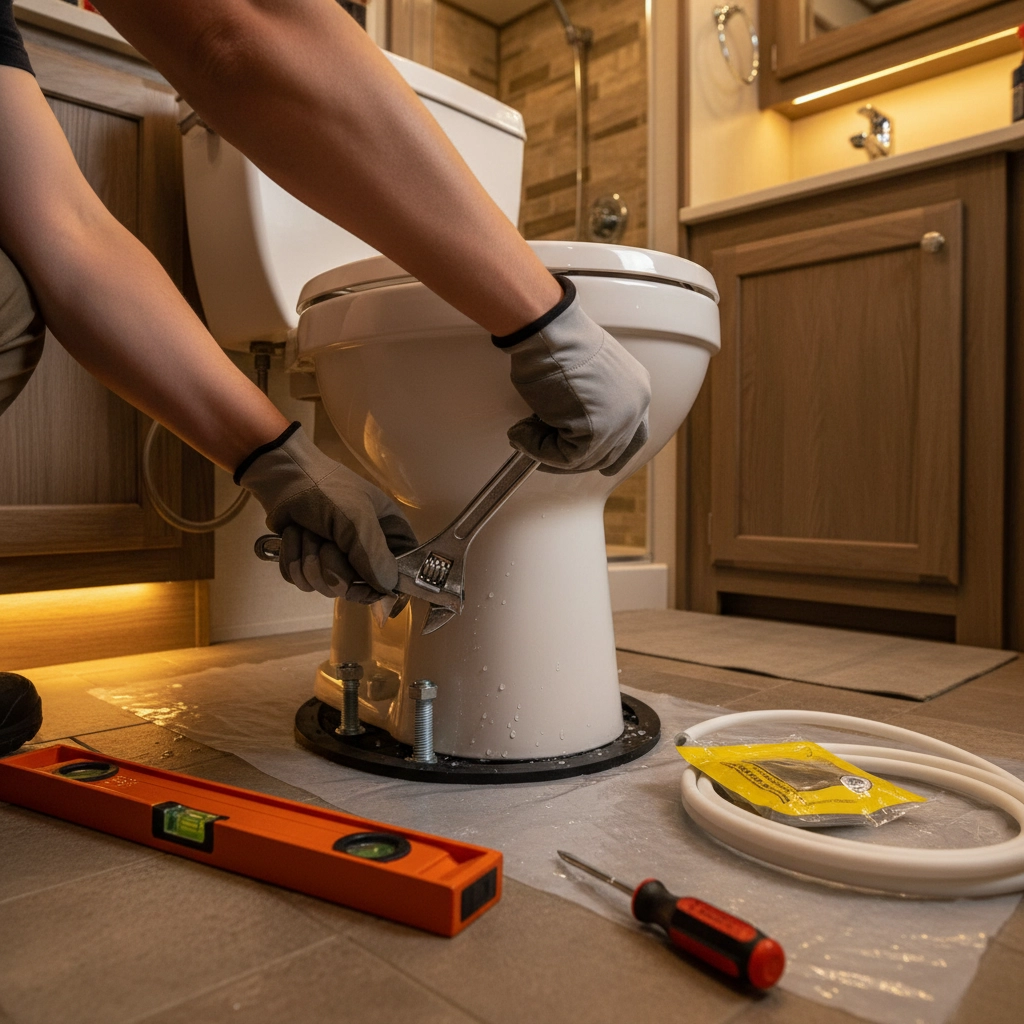
Essential Tools:
Materials:
Step 1: Prepare the Installation Area
Measure your rough-in distance, the space from the wall to the center of the flange. Most RV toilets require 10-11 inches. Remove the old toilet by disconnecting the water line and unbolting from the floor.
Step 2: Check Flange Condition
Inspect the floor flange for cracks or damage. The flange should sit flush with or slightly above the finished floor. Replace if necessary to prevent leaks.
Step 3: Install New Wax Ring
Place a new wax ring on the flange. For RVs that experience significant movement, consider a reinforced wax ring designed for mobile applications.
Step 4: Position and Secure Toilet
Carefully lower the toilet onto the flange, ensuring the mounting bolts align with holes in the toilet base. Apply steady, even pressure to compress the wax ring. Secure with nuts, alternating sides to maintain even pressure.
Step 5: Connect Water Supply
Attach the water supply line, typically 1/2″ compression fitting. Hand-tighten plus 1/4 turn with wrench to prevent over-tightening.
Step 6: Test System
Fill the bowl with water and test flush operation. Check for leaks around the base and water connections. Allow 24 hours before heavy use.
Flush System Maintenance:
Bowl Cleaning:
Use only RV-safe cleaning products that won’t damage rubber seals or plastic components. Avoid bleach-based cleaners that can deteriorate gaskets over time.
Spring Setup:
Fall Winterization:
Hot Climate Maintenance (Southwest U.S.):
Cold Climate Considerations (Northern states):
Laveo Dry Flush Toilet
Nature’s Head Composting Toilet
Dometic 320 Series with Water Saving Mode
For off-road enthusiasts using rugged travel trailers, the composting toilet option pairs exceptionally well with independent suspension systems that minimize vibration and maintain system integrity during challenging terrain navigation.

Travel trailers typically accommodate standard gravity-flush toilets due to adequate space and established black tank systems. Key factors include:
Weight Distribution:
Tank Capacity Matching:
Fifth wheels offer more flexibility due to larger bathroom spaces and weight capacity:
Residential-Style Options:
Compact motorhomes require space-efficient solutions:
Cassette Toilet Benefits:
BlackSeries travel trailers, designed for serious off-road adventures, benefit from specific toilet considerations:
Vibration Resistance:
The enhanced suspension systems require toilets with reinforced mounting and shock-resistant components. Composting toilets excel in this application due to reduced plumbing complexity.
Off-Grid Capability:
Extended boondocking capabilities align perfectly with waterless toilet systems. The robust electrical systems support composting toilet ventilation fans without compromising other systems.
Weight Optimization:
Every pound matters for off-road performance. Lightweight composting or cassette systems complement the trailer’s efficiency-focused design.
Can I use regular toilet paper in my RV toilet?
No, regular household toilet paper doesn’t break down quickly enough for RV systems. Use RV-specific toilet paper like Scott Rapid Dissolve or Camco TST 2-ply, designed to dissolve 4x faster than regular paper.
How often should I empty my RV toilet’s black tank?
Empty when the tank reaches 2/3 capacity, typically every 3-5 days with normal use. Never let it reach 100% full, as this affects flushing performance and can cause expensive backups.
Do composting toilets really smell?
Properly maintained composting toilets are virtually odorless due to ventilation fans and natural decomposition processes. Poor ventilation or incorrect operation can cause odor issues, but these are easily corrected.
Is professional installation required for RV toilets?
Most RV toilets can be installed by handy owners using basic tools. However, if you’re uncomfortable with plumbing work or your RV has non-standard configurations, professional installation ensures proper operation and warranty compliance.
What’s the best RV toilet for cold weather camping?
Composting toilets excel in cold weather since they don’t use water that can freeze. For traditional toilets, ensure proper winterization with RV antifreeze and consider heated tank systems for sub-freezing camping.
How long do RV toilets typically last?
Quality RV toilets last 10-15 years with proper maintenance. Ceramic models generally outlast plastic ones, while composting toilets can last 20+ years due to simpler mechanisms and no water-related wear.
RV Composting Toilets: Best for Boondocking & Installation Guide最先出现在Black Series RV | Off-Road Travel Trailers, Toy Haulers & Camper Trailers | Off road rv | Off grid rv | Overland rv | Off road trailer | Off road travel trailer | Overland travel trailer。