Leveling a travel trailer is essential for safety, comfort, and equipment performance. This guide explains how to level a travel trailer using blocks and jacks step by step.
What Does It Mean to Level a Travel Trailer?
Level travel trailer refers to the process of positioning your RV on a completely horizontal plane, ensuring it sits evenly in all directions. This involves two distinct types of adjustment: side-to-side leveling (adjusting for left-right tilt) and front-to-back leveling (correcting nose-up or nose-down positioning).
Side-to-side leveling typically requires driving one side of your trailer onto leveling blocks to compensate for uneven ground. Front-to-back leveling uses your trailer’s tongue jack to raise or lower the front end until the entire unit sits perfectly horizontal.
Proper leveling is crucial for several reasons. Your RV’s refrigerator requires level operation to function correctly, most absorption refrigerators need to be within 3 degrees front-to-back and 6 degrees side-to-side. Beyond appliance function, leveling ensures doors and windows operate smoothly, prevents water pooling in inappropriate areas, and provides a stable, comfortable living environment.
Why Proper Leveling Matters
Improper leveling can lead to costly equipment damage and safety hazards. RV refrigerators are particularly vulnerable, absorption-style units can suffer permanent damage if operated outside level tolerances for extended periods. The refrigerant mixture separates incorrectly, potentially requiring expensive repairs or complete replacement.
Structural problems also arise from poor leveling. Stabilizer jacks bear excessive stress when compensating for an unlevel trailer, leading to frame damage or jack failure. Window and door frames can warp over time, causing sealing problems and operational issues.
American campgrounds present unique challenges with their varied terrain. Many state parks and national forest campgrounds feature uneven gravel pads, sloped sites, or soft ground conditions. Desert camping in the Southwest often involves sandy surfaces, while mountain camping means dealing with rocky, uneven terrain. Understanding these common scenarios helps you prepare the right leveling strategy.
Safety concerns multiply on unlevel surfaces. An unstable trailer creates fall hazards inside your RV and can shift unexpectedly during setup or takedown procedures.
How to Level a Travel Trailer (Step-by-Step)
Step 1 – Check the Level
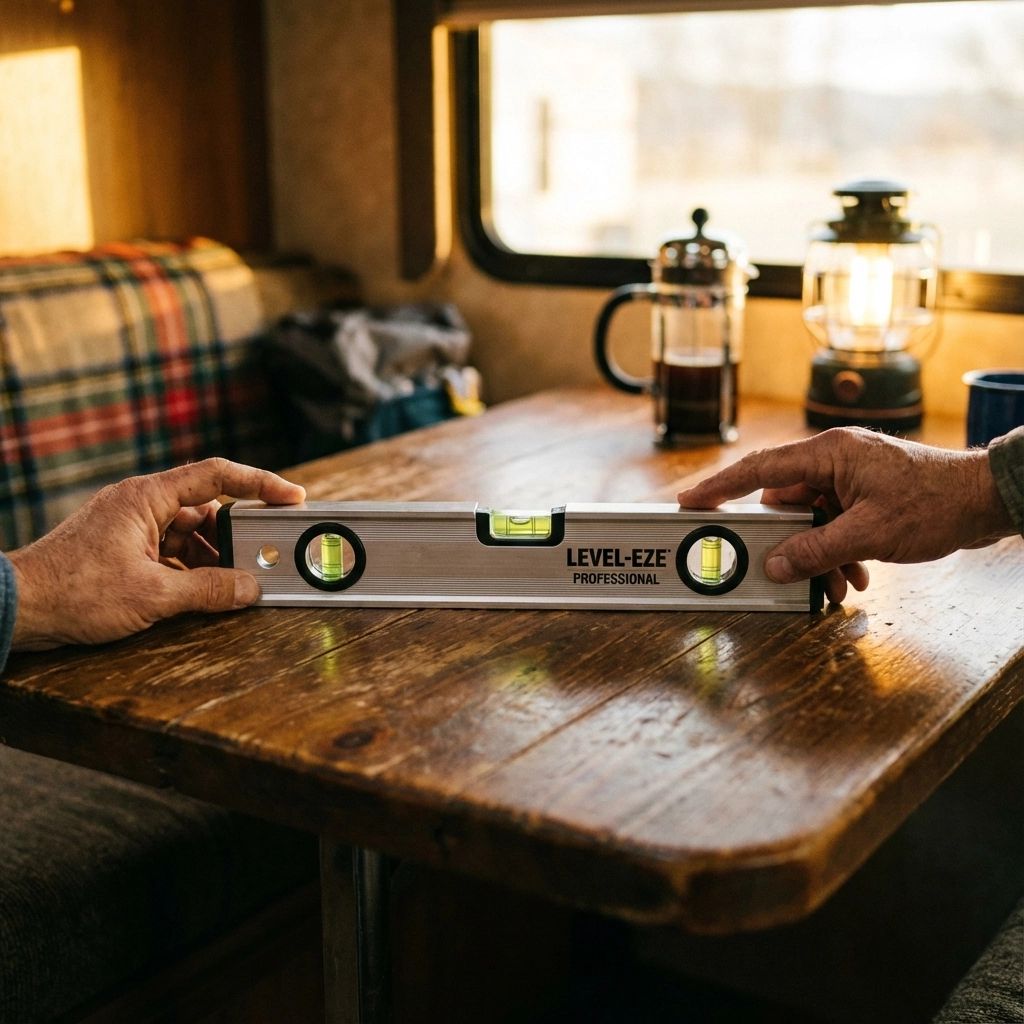
Start with a quality bubble level or digital level designed for RVs. A T-level works exceptionally well because it shows both directions simultaneously. Place your level on a stable, horizontal surface inside your trailer, avoid placing it on countertops that might flex or give false readings.
For the most accurate reading, position the level near your trailer’s center point, typically on the dinette table or a solid counter surface. Some experienced RVers permanently mount a level to their trailer hitch for quick reference during setup.
Digital levels offer precise degree measurements and often include audio alerts when level is achieved. While more expensive than bubble levels, they provide consistent, easy-to-read results in various lighting conditions.
Step 2 – Level Side to Side (Using Blocks)
Travel trailer leveling blocks come in several varieties: interlocking plastic blocks, solid wood blocks, or ramp-style levelers. Interlocking blocks allow precise height adjustment by adding or removing individual pieces. Solid blocks provide maximum stability but require multiple sizes for different elevation needs.
Identify which side sits lower by checking your level. Position your leveling blocks in front of the low side’s tires, ensuring they’re aligned properly with your wheel path. Start with a conservative stack height, you can always add more blocks if needed.
Slowly drive forward onto the blocks while someone guides you or until you feel the trailer become level. Avoid sudden acceleration or hard braking while on blocks, as this can cause them to shift or separate. Once positioned, recheck your level and adjust block height if necessary.

Step 3 – Level Front to Back (Using Jack)
Leveling a trailer with a jack requires disconnecting from your tow vehicle first. Never attempt front-to-back adjustment while still hitched, as this places dangerous stress on your hitch components.
Lower your trailer’s tongue jack until it contacts the ground firmly. If camping on soft ground, place a solid board or jack pad under the jack foot to prevent sinking. Gradually raise or lower the jack while monitoring your level indicator.
Most tongue jacks handle significant weight, but avoid over-extension that could damage the jack mechanism. If you need substantial height adjustment, consider repositioning your entire setup to a more level site rather than maxing out your jack travel.
Work slowly and check your level frequently. Small jack adjustments create larger changes at the trailer’s rear, so patience prevents overshooting your target level.
Step 4 – Stabilize the Trailer
After achieving proper level, deploy your stabilizer jacks to prevent movement during occupancy. Stabilizer jacks differ from leveling jacks, they support the trailer’s weight and reduce bounce, but shouldn’t be used to correct level problems.
Lower each stabilizer jack until it contacts the ground with light pressure. Over-tightening can actually lift one corner and throw off your carefully achieved level. The goal is firm contact that eliminates movement without bearing significant weight.
Deploy stabilizers in a specific sequence: start with the jack diagonal to your tongue jack, then alternate corners to maintain even weight distribution throughout the process.
Travel Trailer Leveling Blocks Explained
Different leveling block materials suit different camping conditions. Plastic interlocking blocks work well on solid surfaces and offer easy height adjustment. Wood blocks provide maximum stability and weight capacity but require pre-cut sizes and take up more storage space.
For off-road and dispersed camping situations common in western states, choose blocks rated for your trailer’s gross weight plus a safety margin. Lightweight plastic blocks might compress or fail under heavy loads, especially on soft ground.
Ramp-style levelers offer convenience for solo campers but work best with moderate height differences. They provide a gradual incline that’s easier to navigate than stacked blocks but offer less precise height control.
Consider purchasing multiple block types for different scenarios. Compact interlocking blocks for established campgrounds, heavy-duty blocks for off-road adventures, and emergency wood blocks for unexpected situations.
Using Jacks Safely When Leveling
Tongue jacks bear your trailer’s entire tongue weight and front-end load during leveling. Understanding your jack’s weight capacity prevents overloading that could cause catastrophic failure. Most travel trailer tongue jacks handle 2,000-5,000 pounds, but check your specific model’s rating.
Stabilizer jacks serve a different purpose, they prevent bounce and sway but shouldn’t lift your trailer’s weight. Using stabilizer jacks for leveling places excessive stress on both the jacks and your trailer’s frame, potentially causing expensive damage.
Soft ground conditions require special attention. Sand, mud, or loose soil can cause jack feet to sink, making your trailer unstable or impossible to retrieve. Always use jack pads, boards, or specialized feet designed for soft surfaces. Concrete blocks work well as emergency jack pads when camping in sandy or muddy conditions.
Position jack pads directly under jack feet before lowering. Attempting to slide pads under loaded jacks risks injury and equipment damage.

Travel Trailer Leveling Tips from Experienced Campers
Travel trailer leveling tips from seasoned RVers can save time and frustration during setup. Solo campers benefit from practice runs at home, know exactly where your level sits and how your trailer responds to adjustments before arriving at a crowded campground after dark.
Create a leveling kit checklist: level, blocks, jack pads, gloves, and wheel chocks. Store everything together in an easily accessible compartment. Mark your most commonly used block configurations for quick setup.
Night and weather challenges require preparation. LED headlamps provide hands-free lighting better than flashlights. Practice your leveling routine until you can perform it by feel in case you arrive after dark or during rain.
Develop a measurement system for your most frequent camping spots. Many RVers keep notes about popular campgrounds, recording which sites require specific block configurations. This advance knowledge speeds setup significantly.
For couples, establish clear communication signals. Hand signals work better than shouting over generator noise or wind. Agree on who drives and who guides before starting the process.
Common Mistakes to Avoid
Using stabilizer jacks to lift your trailer represents the most common and dangerous leveling mistake. Stabilizers aren’t designed to bear significant weight or provide lift. This practice can damage both the jacks and your trailer frame, creating safety hazards and expensive repairs.
Forgetting wheel chocks creates serious safety risks. Even properly leveled trailers can roll on sloped sites if wheels aren’t secured. Place chocks on both sides of wheels remaining on the ground, particularly when parked on any grade.
Over-stacking leveling blocks reduces stability and increases failure risk. Most blocks are safe when stacked 4-6 inches high, but excessive height creates a precarious foundation. If you need more lift, find a better campsite or use different equipment.
Deploying slide-outs before leveling creates additional complexity and potential damage. Slide-outs operate best on level surfaces and may bind or suffer seal damage if deployed on an unlevel trailer. Always complete leveling before extending any slide-outs.
Another frequent error involves rushing the process. Take time to check your work at each step, a few extra minutes during setup prevents problems later.
How Trailer Design Affects Leveling
Modern trailer design significantly impacts leveling ease and stability. Chassis rigidity determines how well your trailer maintains level under load and prevents flex that could affect appliance operation or door/window function.
Jack travel and placement vary considerably between manufacturers. Longer jack travel provides more adjustment range for uneven sites, while dual jacks distribute weight more evenly. Quality jack systems include positive stops and smooth operation under load.
BlackSeries travel trailers incorporate several design advantages for challenging terrain. Independent suspension systems maintain stability during leveling procedures, while reinforced chassis construction resists flex that could affect level accuracy. Higher ground clearance accommodates larger leveling blocks without limiting departure angles.
The integration of robust stabilizing systems and extended jack travel specifically addresses off-road camping challenges where conventional trailers struggle. When exploring remote camping locations, these design elements become essential for safe, comfortable setup on unimproved surfaces.
Frame geometry also affects leveling requirements. Trailers with lower profiles or longer wheelbases typically require less dramatic adjustments, while compact trailers might need more frequent leveling due to their shorter stabilizing footprint.
FAQ – Level Travel Trailer
How level does a travel trailer need to be?
Most RV appliances, particularly absorption refrigerators, require level operation within 3 degrees front-to-back and 6 degrees side-to-side. For comfort and proper door/window operation, aim for as close to perfectly level as possible. A good bubble level will show when you’re within acceptable tolerances.
Can I level a trailer alone?
Yes, solo leveling is definitely possible with practice. Use wheel chocks for safety, work methodically through each step, and consider investing in a digital level with audio alerts. Many solo RVers develop efficient systems that take just 10-15 minutes once mastered.
Do I need leveling blocks on concrete pads?
Even concrete pads are rarely perfectly level. Most established campgrounds have slight slopes for drainage, requiring at least minor leveling adjustments. Concrete pads make the process easier since blocks won’t sink, but you’ll still typically need some height adjustment.
Are stabilizer jacks safe for leveling?
No, stabilizer jacks should never be used for leveling. They’re designed to prevent bounce and sway, not to lift your trailer’s weight. Using them for leveling can damage both the jacks and your trailer frame. Always use proper leveling blocks and your tongue jack for height adjustments.

