Resealing an RV roof involves inspecting existing sealant, removing damaged areas, applying new RV roof sealant, and ensuring all seams are watertight. This critical maintenance task prevents costly water damage and extends your RV’s lifespan significantly.
Why Resealing Your RV Roof Is Critical
RV roof leaks rank among the most common and expensive problems facing American RV owners. According to industry data, water intrusion causes over 80% of structural damage in recreational vehicles, with repair costs often exceeding $15,000 when caught too late.
The cost comparison between preventive resealing and major structural repair is striking. Professional resealing typically costs $300-800, while interior water damage repairs can range from $5,000-25,000 depending on the extent of damage to walls, flooring, and electrical systems.
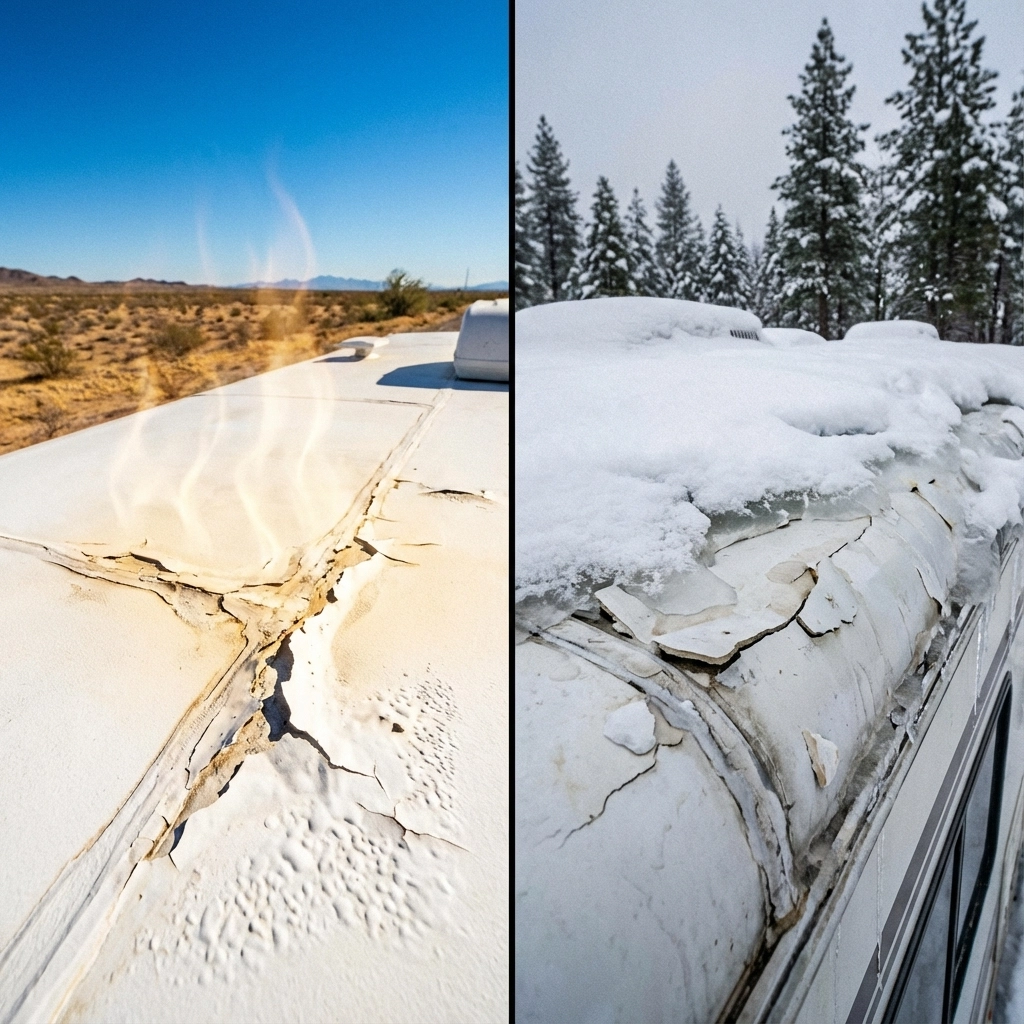
Real-world usage scenarios across the United States present unique challenges. From Arizona’s intense UV exposure that can crack sealant within 18 months, to Minnesota’s freeze-thaw cycles that cause expansion and contraction, to coastal regions where salt air accelerates deterioration, your RV roof faces constant environmental stress.
What Does “Reseal RV Roof” Mean?
Resealing involves systematically inspecting, cleaning, and applying new weatherproof sealant to all joints, seams, and penetrations on your RV roof. This differs significantly from simple patching (spot repairs) or full roof replacement (complete membrane renewal).
Understanding your RV roof material is crucial for proper resealing:
EPDM (Ethylene Propylene Diene Monomer): A flexible rubber membrane requiring specialized EPDM-compatible sealants and careful handling to avoid tearing.
TPO (Thermoplastic Polyolefin): A heat-weldable membrane that offers excellent UV resistance but requires specific TPO-approved adhesives and sealants.
Fiberglass: A hard, gel-coated surface that resists punctures but can develop stress cracks requiring epoxy-based repair compounds.
Aluminum: Traditional metal roofing that expands and contracts significantly, demanding flexible sealants that maintain adhesion through temperature cycles.
How Often Should You Inspect and Reseal an RV Roof?
Professional RV technicians recommend monthly visual inspections and comprehensive resealing every 1-3 years, depending on several factors:
Storage conditions dramatically impact maintenance schedules. RVs stored outdoors in direct sunlight require twice as frequent attention compared to covered storage. For comprehensive storage guidance, reference our winterization protocols to protect your investment during off-seasons.
How to Reseal an RV Roof: Complete Process
RV Roof Sealant Inspection Checklist
Begin with a thorough inspection using this systematic approach:
- Cracks or gaps in existing sealant, particularly at seam intersections
- Lifting or peeling edges where sealant has lost adhesion
- Discoloration or brittleness indicating UV degradation
- Soft spots or moisture signs suggesting water penetration
- Chalky residue on EPDM surfaces indicating membrane deterioration
Pay special attention to areas around roof vents, air conditioning units, solar panels, and antenna mounts, these high-stress zones fail first.
Tools & Materials Needed
Professional-grade results require proper equipment:
Essential Tools:
- RV roof sealant (material-specific)
- Plastic scrapers (avoid metal that can damage membranes)
- High-quality cleaning solution
- Caulking gun with smooth flow control
- Protective gloves and safety glasses
- Non-abrasive brushes
Safety Equipment:
- Roof-rated ladder with stabilizer bars
- Non-slip shoes with soft soles
- Safety harness for steep or high roofs
Step-by-Step Resealing Process
1. Clean and Prepare the Roof Surface
Start with a thorough cleaning using appropriate RV roof cleaners. Avoid household detergents that can leave residue affecting sealant adhesion. For detailed cleaning techniques, consult our RV exterior cleaning guide for material-specific recommendations.
2. Inspect All Seams, Vents, and Edges
Walk the entire roof systematically, marking problematic areas with chalk or removable tape. Document findings with photos for reference during repair.
3. Remove Damaged or Loose Sealant
Use plastic scrapers to remove failing sealant without damaging the underlying roof material. Work slowly and deliberately, rushing this step leads to surface damage requiring expensive repairs.
4. Apply New RV Roof Sealant Evenly
Apply sealant in consistent beads, maintaining steady pressure on the caulking gun. Self-leveling sealants work best for horizontal surfaces, while non-sag formulations suit vertical applications.
5. Allow Proper Curing Time
Most quality sealants require 24-48 hours for full cure. Avoid foot traffic and protect from moisture during this critical period.
6. Perform Final Leak Inspection
Test your work with a gentle water spray, starting from the lowest point and working upward. Monitor interior areas for any signs of water penetration.

Best RV Roof Sealants: What to Look For
Selecting the right sealant dramatically affects longevity and performance:
Self-Leveling Sealants automatically flow to fill gaps and create smooth surfaces. Ideal for seams and large flat areas, these maintain flexibility through temperature extremes.
Non-Sag Sealants resist dripping on vertical surfaces like vent flanges and corner joints. These thicker formulations provide excellent gap-filling properties.
UV Resistance is non-negotiable for American climates. Premium sealants include UV inhibitors that prevent breakdown under intense sunlight exposure.
Flexibility Over Temperature Changes ensures sealant remains bonded during expansion and contraction cycles. Quality products maintain elasticity from -40°F to +180°F.
Material Compatibility prevents chemical reactions that cause premature failure. Always verify sealant compatibility with your specific roof material, using incompatible products voids warranties and causes expensive damage.
Common RV Roof Leak Areas You Should Never Ignore
Industry data reveals leak patterns that every RV owner should prioritize:
Roof Seams account for 40% of all roof leaks, particularly where side walls meet the roof structure. These high-stress areas require premium sealants and regular maintenance.
Vents and Skylights create complex geometries with multiple sealing surfaces. Factory installations often use minimal sealant, requiring enhancement within the first year.
Air Conditioner Base represents the largest roof penetration with significant weight and vibration stresses. Improper sealing here causes catastrophic damage quickly.
Ladder Mounts and Roof Edges experience constant stress from use and wind loads. These often-overlooked areas require specialized attention during resealing.
Mistakes to Avoid When Resealing an RV Roof
Using Household Silicone ranks as the most expensive mistake RV owners make. Standard bathroom caulks lack UV resistance and flexibility, failing within months and damaging roof materials during removal.
Applying Sealant Over Dirt or Moisture prevents proper adhesion, creating immediate failure points. Surface preparation accounts for 80% of long-term sealant success.
Ignoring Manufacturer Compatibility between sealants and roof materials causes chemical reactions leading to premature failure. Always verify compatibility before application.
Skipping Regular Inspections allows minor issues to become major problems. Monthly visual checks prevent 90% of serious leak damage.
For comprehensive maintenance scheduling, review our RV protection strategies that integrate roof care with overall system maintenance.
Preventive RV Roof Maintenance Tips
Regular Cleaning extends sealant life by removing debris that traps moisture and causes premature deterioration. Quarterly deep cleaning prevents most common failure modes.
Scheduled Inspections should occur monthly during use seasons and immediately after severe weather events. Document findings to track wear patterns and predict maintenance needs.
Storage Best Practices include covering or indoor storage when possible, maintaining proper tire pressure to prevent roof stress, and positioning to minimize UV exposure.
Travel-Related Stress Checks after long trips or rough roads help identify vibration-induced sealant separation before leaks develop.
FAQs About Resealing an RV Roof
How do I know if my RV roof needs resealing?
Look for cracked, peeling, or discolored sealant around seams and penetrations. Interior water stains or musty odors indicate immediate attention is required.
Can I reseal an RV roof myself?
Yes, with proper materials and techniques, DIY resealing saves significant labor costs. However, safety concerns and warranty considerations may favor professional service for some owners.
How long does RV roof sealant last?
Quality sealants typically last 2-5 years depending on climate, material type, and maintenance. Extreme UV exposure or temperature cycling reduces lifespan significantly.
What is the best sealant for an RV roof?
Material compatibility is paramount: EPDM requires EPDM-compatible sealants, TPO needs TPO-approved products. Self-leveling formulations work best for most applications.
How much does it cost to reseal an RV roof?
DIY resealing costs $50-200 in materials for typical RVs. Professional service ranges from $300-800 depending on size and complexity.
Why BlackSeries RV Owners Take Roof Maintenance Seriously
BlackSeries RV owners venture into remote locations where roof failure can end adventures and create dangerous situations. Our off-road and overland usage scenarios demand absolute reliability: a roof leak 100 miles from the nearest town isn’t just inconvenient, it’s potentially hazardous.
The rugged environments where BlackSeries RVs excel: from Mojave desert expeditions to Alaskan backcountry adventures: subject roof systems to extreme stresses. Temperature swings from below freezing to over 120°F, constant vibration from rough terrain, and exposure to abrasive dust and debris accelerate wear beyond typical RV usage patterns.
BlackSeries owners understand that preventive maintenance isn’t optional: it’s essential for safety and adventure continuity. Regular roof inspection and resealing ensure your investment continues performing when you need it most, whether you’re exploring remote BLM land or conquering challenging overland routes.
Proper roof maintenance protects not just your RV, but your ability to explore with confidence. In remote locations, prevention is always better than emergency repairs, making systematic roof care a cornerstone of responsible adventure travel.

