Your cart (0)
Your cart is empty
Tax included and shipping calculated at checkout
Your cart is empty
Tax included and shipping calculated at checkout

RV toilet seal leaks are usually caused by worn, cracked, or loose seals: fixing it promptly prevents odors, floor rot, and black tank problems.
Nobody wants to deal with a leaking RV toilet, but it's one of those maintenance issues that demands immediate attention. Whether you're dealing with water pooling around the base or mysterious odors wafting through your rig, a failing toilet seal can quickly turn your dream camping trip into a nightmare scenario.
The good news? Most RV toilet seal problems are fixable with basic tools and a little know-how. Understanding what's happening and taking prompt action will save you from costly repairs and keep your adventure rolling.
An RV toilet seal is essentially the guardian of your sanitation system. Unlike residential toilets that rely on a simple wax ring, RV toilets use multiple seals to handle the unique challenges of life on the road.
The flange seal (also called the base seal) sits between your toilet and the floor, preventing waste and water from leaking into your RV's structure. This seal must withstand constant vibration, temperature changes, and the stress of driving over rough terrain.
The valve seal (or flush ball seal) controls water retention in the toilet bowl. When you flush, this black rubber seal opens to allow contents into the black tank, then closes to hold fresh water for the next use. This seal also prevents sewer gases from entering your living space.
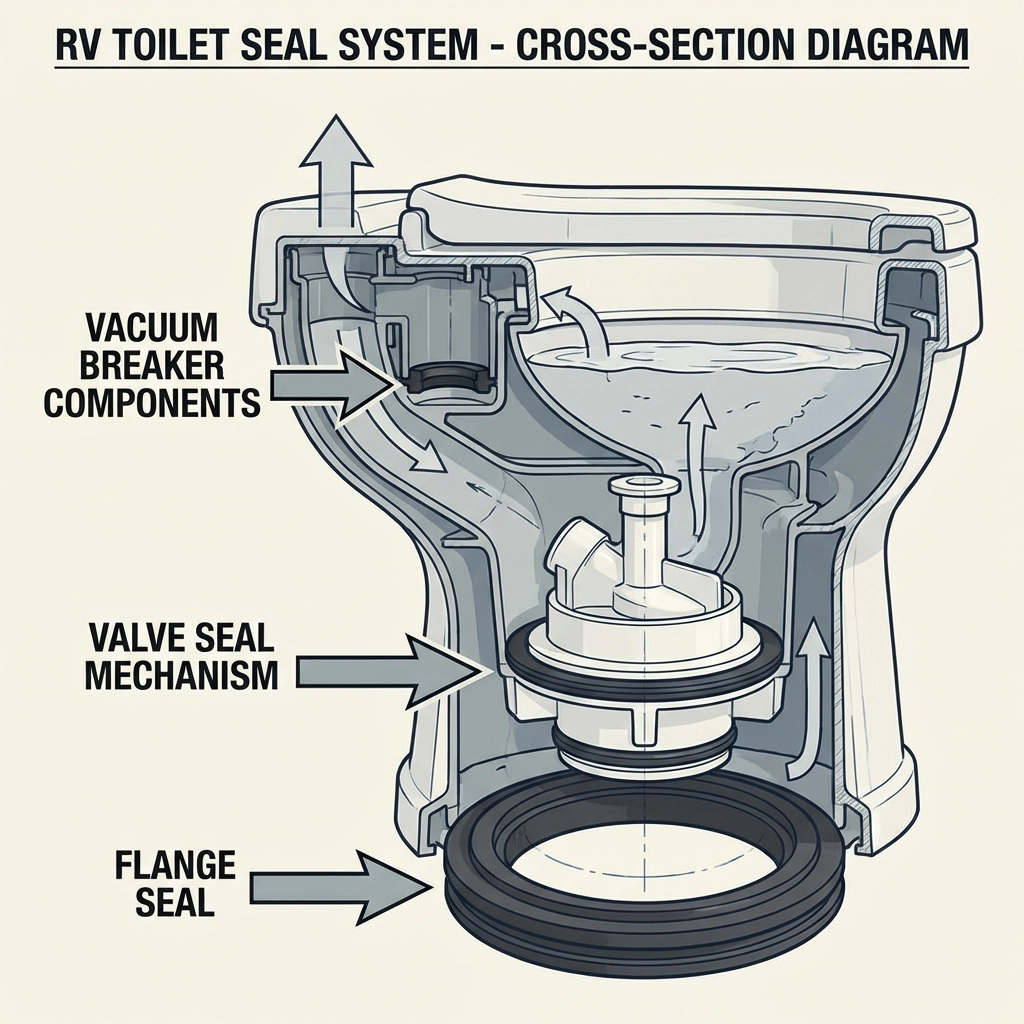
Finally, some RV toilets include a vacuum breaker seal in the upper assembly, which prevents backflow and maintains proper flushing pressure. These seals work together to create a sanitary barrier between your living space and the waste system below.
Catching a toilet seal leak early can save you thousands in floor repair costs. Here's what to watch for:
Water around the toilet base is the most obvious sign of a flange seal failure. You might notice damp spots, discoloration, or actual standing water around the toilet's mounting points.
Bowl won't hold water between flushes indicates a valve seal problem. If you add water to the bowl and it slowly disappears, that black rubber seal isn't creating a proper barrier anymore.
Sewer odors inside your RV often signal seal failure somewhere in the system. These smells are more than just unpleasant: they indicate gases are escaping where they shouldn't be.
Soft or discolored flooring around the toilet suggests long-term leaking has begun rotting your subfloor. This is expensive damage that requires immediate attention to prevent spreading.
Understanding the root causes helps prevent future problems and guides your repair approach.
RV toilet seals face a harsh environment. Extended periods without use allow seals to dry out and crack, especially in hot climates or during winter storage. Chemical toilet treatments, while necessary for sanitation, can also degrade rubber seals over time if they're overly aggressive or used in excessive concentrations.
Toilet paper residue, hard water mineral deposits, and waste buildup prevent seals from creating a tight closure. Even small particles stuck on the seal surface can cause slow leaks that gradually worsen.
Road vibration gradually loosens the bolts holding your toilet to the floor. This creates movement that stresses the flange seal and can mimic leak symptoms even when the seal itself is still good.
Over-tightening mounting bolts can crack plastic flanges or toilet bases, creating leak paths that no amount of seal replacement will fix. Age-related plastic fatigue also weakens these components over time.
Before starting any toilet repair, gather your supplies and prepare for a potentially messy job. You'll need replacement seals, basic hand tools, gloves, and cleaning supplies.
Determine whether you're dealing with a bowl seal (valve) leak or a base (flange) leak. Add water to the toilet bowl and observe where it escapes. Base leaks appear around the toilet mounting points, while bowl leaks show up as water slowly disappearing from the bowl itself.
Turn off your water pump and close any water valves feeding the toilet. Flush several times to empty the bowl and remove as much water as possible from the lines. This prevents flooding during disassembly.
For flange seal replacement, you'll need to remove the entire toilet. Disconnect the water supply line (usually a quick-disconnect fitting), then remove the mounting bolts holding the toilet to the floor. Lift straight up to avoid damaging the flange.
For valve seal replacement, many RV toilets allow access by simply lifting or removing the toilet bowl from its base mechanism.

Remove the old seal completely: never stack new seals on top of old ones. Clean all seating surfaces thoroughly before installing the new seal. Pay attention to seal orientation; most have a specific direction they must face to function properly.
For flange seals, ensure the seal sits evenly around the entire flange. For valve seals, verify the seal mechanism moves freely and creates complete contact when closed.
Carefully lower the toilet back into position, ensuring proper alignment with mounting bolts. Tighten bolts evenly in a cross pattern, but don't over-tighten: plastic components crack easily.
Reconnect water supply and test thoroughly by flushing several times and checking for leaks around all connection points.
Having the right parts and tools makes this job much easier:
Avoid these costly errors that can turn a simple repair into a major headache:
Using household wax rings designed for residential toilets won't work in RV applications. The constant movement and temperature changes will cause them to fail quickly.
Over-tightening mounting bolts cracks plastic components and actually creates new leak paths. Snug is sufficient: plastic threads strip easily.
Skipping flange inspection means missing cracks or damage that will cause your new seal to fail prematurely. Always examine the entire mounting system.
Ignoring early warning signs like intermittent odors or slight dampness leads to expensive floor damage. Address small problems before they become big ones.
Regular maintenance prevents most toilet seal problems:
Keep seals lubricated with RV-safe lubricants. This prevents drying and cracking during storage periods. A light coating every few months maintains flexibility.
Use RV-specific chemicals in proper concentrations. Household cleaners and excessive chemicals damage rubber seals over time.
Inspect seals quarterly for signs of wear, cracking, or buildup. Catching problems early saves major repair costs.
Prepare properly for storage by adding appropriate antifreeze and storing with seals slightly moist to prevent cracking.

Can I use my RV toilet if the seal is leaking?
Minor valve seal leaks that only cause slow water loss from the bowl are usually safe for short-term use, but base leaks should be fixed immediately to prevent floor damage and sanitation issues.
How often should RV toilet seals be replaced?
Valve seals typically last 3-5 years with regular use, while flange seals can last 5-10 years if properly maintained. Replacement frequency depends on usage, chemical exposure, and storage conditions.
Why does my RV toilet lose water from the bowl overnight?
This almost always indicates a failing valve seal that's allowing water to slowly leak into the black tank. While not immediately dangerous, it should be repaired to prevent odors and ensure proper flushing.
Is replacing an RV toilet seal a DIY job?
Most RV owners can handle valve seal replacement with basic tools and patience. Flange seal replacement requires removing the entire toilet but is still manageable for DIYers comfortable with plumbing tasks. When in doubt, consult a professional to avoid costly damage.
Understanding your RV toilet seal system and addressing problems quickly keeps your adventures comfortable and sanitary. While nobody enjoys dealing with toilet repairs, taking action at the first sign of trouble prevents minor issues from becoming major headaches down the road.
For more RV maintenance tips and off-road adventure guidance, BlackSeries RV provides the expertise and equipment to keep you exploring confidently, no matter where the trail leads.
Explore the Black Series lineup
Ready for the trail? See the Yellow Stone vs Rocky Mountain editions — and see which build is worth it.
Related reading: