Sanitizing an RV water tank removes bacteria, algae, and odor-causing buildup. Regular RV water tank sanitizing is essential for safe drinking water and long-term system health. Whether you’re dealing with that musty smell after winter storage or preparing for a cross-country adventure, proper water tank maintenance keeps your fresh water system functioning optimally.
What Does It Mean to Sanitize an RV Water Tank?
Sanitizing your RV water tank goes far beyond a simple rinse or flush. While cleaning removes visible dirt and debris, sanitizing eliminates microscopic bacteria, mold, and algae that can multiply in your water system. This process involves using disinfectants like bleach or specialized RV sanitizers to kill harmful microorganisms.
Your fresh water tank serves as the primary reservoir for all water-related activities in your RV – from drinking and cooking to showering and dishwashing. Unlike your home’s municipal water system that’s continuously treated, your RV’s water sits stagnant for extended periods, creating ideal conditions for bacterial growth.
The key difference between sanitizing and cleaning is that sanitizing targets microscopic threats that can’t be removed through physical cleaning alone. A clean-looking tank might still harbor bacteria that cause unpleasant tastes, odors, and potential health risks.
When Should You Sanitize Your RV Water Tank?
Timing your water tank sanitization correctly ensures optimal water quality throughout your travels. Here are the critical times when sanitization becomes essential:
New RV or after purchase – Even brand-new RVs require initial sanitization, as manufacturing residues and testing water can leave contaminants in the system.
Post-winter storage – After months of sitting unused, your water system becomes a breeding ground for bacteria and algae, making spring sanitization crucial.
Detecting odors or slimy water – If your water smells musty, metallic, or feels slick, immediate sanitization is necessary.
After remote or questionable water sources – Following off-grid adventures where you’ve filled from wells, streams, or unfamiliar sources, sanitization prevents contamination buildup.
According to the Recreation Vehicle Industry Association (RVIA), RV owners should sanitize their fresh water tanks at least every six months, with many experienced RVers doing it quarterly during heavy use periods.
Common Causes of RV Water Tank Odor
Understanding what causes water tank odors helps you prevent future problems and recognize when sanitization is overdue. The most common culprits include:
Bacterial and algae growth – Stagnant water, especially in warm conditions, provides perfect breeding conditions for microorganisms that produce sulfur-like or musty odors.
High-temperature storage – RVs parked in hot climates accelerate bacterial growth, with tanks reaching temperatures that promote rapid contamination.
Organic matter residue – Food particles, soap residue, or natural minerals from various water sources accumulate over time, feeding bacterial colonies.
Contaminated water lines and pump – Even with a clean tank, dirty water lines, pumps, or fixtures can reintroduce contaminants throughout your system.
Cross-contamination from grey water – Improperly sealed systems can allow grey water odors to migrate into fresh water lines.
The key to removing RV water tank odor lies in addressing both the source and the entire water system, not just the tank itself.
How to Sanitize RV Water Tank (Step-by-Step)
This comprehensive method uses household bleach – the most effective and widely available sanitizing agent. Follow these steps for thorough how to disinfect rv fresh water tank treatment:
Step 1: Drain the fresh water tank completely – Turn off your water pump and open all faucets to drain existing water. Don’t forget the low-point drains underneath your RV.
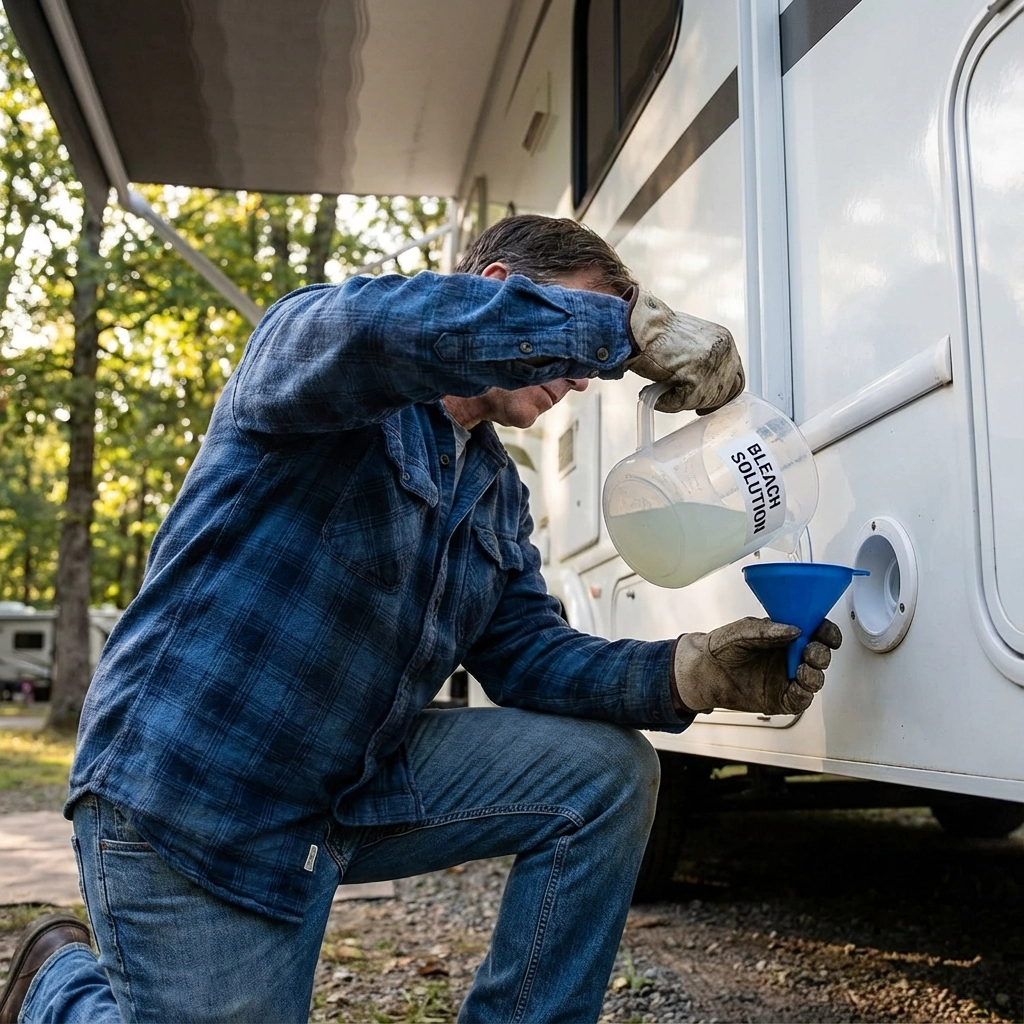
Step 2: Prepare your bleach solution – Mix ¼ cup of unscented household bleach with one gallon of water for every 15 gallons of tank capacity. Never use scented or color-safe bleaches.
Step 3: Add solution to tank – Pour the bleach mixture into your fresh water tank through the fill port. Use a funnel to avoid spillage and wear gloves for safety.
Step 4: Fill tank with fresh water – Top off the tank completely with clean water, allowing the bleach solution to mix thoroughly.
Step 5: Circulate through entire system – Turn on your water pump and run each faucet (hot and cold) until you smell bleach. Don’t forget outdoor showers, toilet water, and ice makers.
Step 6: Let solution dwell – Allow the bleach solution to sit in your system for 4-12 hours. Overnight treatment provides optimal disinfection.
Step 7: Flush system thoroughly – Drain the tank completely and refill with fresh water. Run all faucets until the bleach odor disappears completely.

RV Water Tank Sanitizing Checklist
Having the right supplies ready makes sanitization efficient and effective:
- Unscented liquid bleach (6% sodium hypochlorite)
- Clean measuring cup for accurate bleach ratios
- Large funnel for mess-free tank filling
- Disposable gloves to protect your hands
- Timer or phone to track dwell time
- Fresh water source for flushing
- Flashlight or headlamp for checking connections
- Paper towels for cleanup
Pro tip: Create a sanitization kit that stays in your RV, making the process routine rather than a major project.
Cleaning the Entire RV Water System (Not Just the Tank)
Effective RV water system cleaning extends beyond the fresh water tank to include every component that touches your water supply:
Water lines and connections – The bleach solution should reach all supply lines, but stubborn biofilm might require additional flushing or specialized cleaners.
Water pump – Most pumps self-clean during the sanitization process, but check manufacturer recommendations for any special procedures.
Faucets and fixtures – Remove aerators and showerheads to soak separately in bleach solution, as these components trap debris and bacteria.
Hot water heater – Decide whether to include your hot water heater in sanitization or bypass it. If including it, follow manufacturer guidelines and never exceed temperature recommendations.
Water filter systems – Remove and replace filter cartridges before sanitizing, as bleach will damage most filter media.
Remember that a thorough rv water system cleaning addresses contamination sources throughout your plumbing, preventing recontamination of your freshly sanitized tank.
Best Practices to Keep RV Water Fresh Longer
Prevention beats frequent sanitization. These practices extend the time between necessary treatments:
Proper water storage techniques – Keep tanks filled to reduce air space where bacteria thrive, but leave room for expansion in freezing temperatures.
Use dedicated drinking water hoses – White or blue drinking water hoses prevent chemical contamination from standard garden hoses.
Understand water source risks – Municipal water generally requires less frequent sanitization than well water or natural sources. Research your water sources before filling.
Consider off-road scenarios – Extended boondocking or remote camping increases contamination risk, especially when using questionable water sources or dealing with extreme temperatures.
For BlackSeries RV owners tackling challenging off-road adventures, these prevention strategies become even more critical as you’re often far from convenient sanitization facilities.
Why BlackSeries RVs Are Designed for Easier Water Tank Sanitizing
BlackSeries RVs incorporate several design features that simplify water system maintenance for adventurous travelers:
Accessible drain systems – Strategic placement of drain valves and access panels makes complete tank drainage straightforward, even in rough terrain.
Quality tank materials – Food-grade polyethylene tanks resist bacterial adhesion and handle sanitizing chemicals without degradation.
Adventure-focused design philosophy – Recognizing that BlackSeries owners often venture into remote areas with questionable water sources, the water systems are built for frequent maintenance cycles without component wear.
These design considerations reflect real-world use patterns where traditional RV water maintenance schedules might not suffice for serious off-road adventures.
FAQ
How often should I sanitize my RV water tank?
Sanitize at minimum every six months, or quarterly during heavy use. After winter storage, before major trips, and whenever you detect odors or taste changes, sanitization becomes necessary.
Can I drink RV water immediately after sanitizing?
Only after completely flushing the bleach from your system. Run all faucets until you can’t smell or taste bleach. Many RVers wait 24 hours and perform an additional flush before drinking.
Is vinegar better than bleach for RV water tanks?
Bleach provides superior disinfection against bacteria and viruses. While vinegar can help with mineral buildup and mild sanitization, it’s less effective against serious contamination. Use vinegar as a maintenance cleaner between bleach sanitizations.
How long does the bleach smell last in my RV water system?
With proper flushing, bleach odor should disappear within 24-48 hours. If odor persists, continue flushing or add a small amount of baking soda to neutralize remaining chlorine.
Do I still need to sanitize if I only use bottled water?
Yes, because your water system still requires maintenance. Humidity, dust, and residual moisture create environments for bacterial growth regardless of your primary water source.
Regular water tank sanitization ensures safe, pleasant-tasting water throughout your RV adventures. Whether you’re planning extended boondocking sessions or just maintaining your investment, this simple maintenance task protects both your health and your RV’s water system longevity.

