Travel Trailer Waterproofing Quick Reference
Water intrusion remains the #1 maintenance concern for travel trailer owners in 2026, with roof seams, windows, vents, and underbody exposure being the most vulnerable leak points. Effective waterproofing centers on three critical practices: regular inspection, professional-grade sealing, and proactive maintenance cycles.
BlackSeries off-road trailers feature reinforced waterproof construction with military-grade sealants, welded aluminum frames, and impact-resistant underbelly protection: designed to withstand harsh terrain while maintaining watertight integrity for years of adventure.
Take Action Now: Inspect your roof every 90 days, replace aging sealants before cracks appear, and invest in quality materials that match your trailer’s specific roof type (TPO, EPDM, or fiberglass).
What Causes Travel Trailer Leaks?
Understanding leak sources helps prioritize your waterproofing efforts and budget. Here’s what causes 90% of travel trailer water damage:
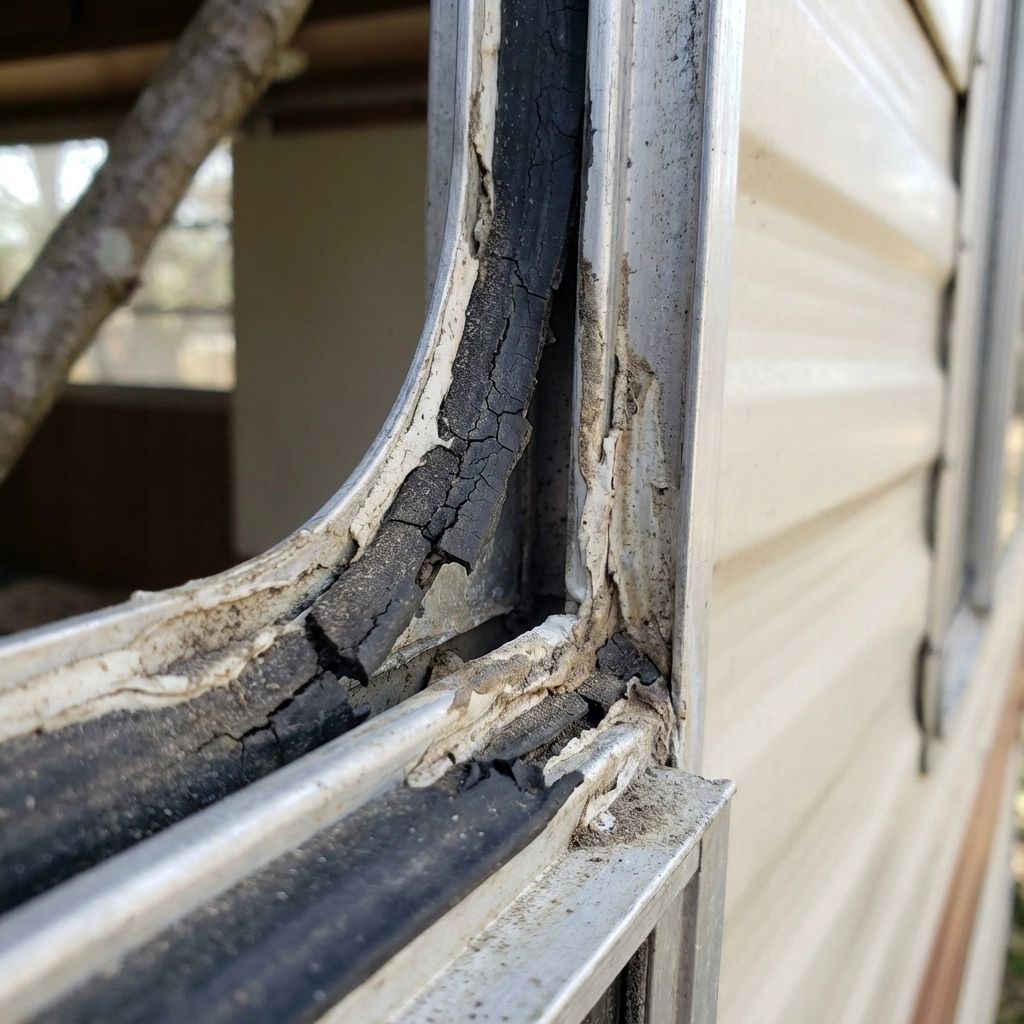
Roof Sealant Aging
Most RV manufacturers use basic sealants with 2-3 year lifespans. UV exposure, temperature cycling, and general aging cause sealant shrinkage and cracking. In 2026, industry data shows roof-related leaks account for 65% of warranty claims, making roof maintenance your highest priority.
Window & Door Frame Shrinkage
Extreme temperature swings: from desert heat to mountain cold: cause window frames and door seals to expand and contract. This constant movement eventually breaks sealant bonds, creating entry points for moisture. The problem intensifies in harsh climates where temperature variations exceed 60°F daily.
Sidewall Seams & Moldings
Travel trailers experience constant road vibration and flexing during transport. Sidewall seams, especially around slide-outs and exterior storage compartments, develop micro-cracks that gradually worsen. These areas often go unnoticed until significant water damage occurs.
Underbelly Exposure
Off-road adventures expose trailer underbellies to rock impacts, branch scrapes, and debris strikes. Standard RV construction uses thin plastic sheeting that tears easily, while dispersed camping adventures increase exposure to harsh terrain that can compromise underbelly integrity.
Improper Maintenance Habits
Neglected inspection schedules cause 70% of major leak problems. Many owners wait until visible damage appears rather than catching issues early. Professional RV technicians recommend quarterly inspections, but most owners inspect annually or less frequently.
Comprehensive Travel Trailer Waterproofing Checklist
Follow this professional-grade waterproofing process to create lasting protection:
Step 1: Inspect Roof & Critical Seams
Start with a thorough visual inspection of your roof membrane. Look for:
- Cracked or shrinking sealant around vents, antennas, and air conditioning units
- Loose or lifting roof membrane edges
- Discoloration indicating water intrusion
- Soft spots that flex under gentle pressure
Document problem areas with photos and prioritize repairs by severity.
Step 2: Clean & Prepare All Surfaces
Remove old, failed sealant using a plastic scraper: never use metal tools that can damage roof membranes. Clean surfaces with denatured alcohol to remove residue and ensure optimal adhesion. Allow complete drying before proceeding.
Step 3: Apply Premium RV Sealants
Choose sealants specifically designed for your roof type:
- Dicor self-leveling sealant for EPDM rubber roofs
- Polyurethane sealants for fiberglass and metal surfaces
- Silicone-based products for TPO and PVC membranes
BlackSeries trailers use marine-grade polyurethane sealants with 20+ year lifespans, significantly outperforming standard RV sealants.
Step 4: Reinforce High-Stress Areas
Windows, vents, and roof penetrations experience the most movement. Install butyl tape backing before applying finish sealant for double protection. This creates a primary and secondary water barrier system.

Step 5: Waterproof the Underbelly
Inspect and repair underbelly damage immediately. Options include:
- Spray-on waterproof coatings for small holes and tears
- Reinforcement panels for larger damaged areas
- Complete underbelly replacement for extensive damage
Step 6: Apply Protective Roof Coatings
Liquid roof coatings add UV protection and extend sealant life. Popular options include:
- Liquid EPDM for rubber roofs (10-year protection)
- Silicone coatings for multi-surface compatibility
- Polyurethane coatings for maximum durability
Step 7: Perform Professional Leak Testing
Use garden hose testing to verify repairs. Start from bottom and work upward, saturating one area at a time while an assistant checks interior for water intrusion. Professional pressure testing provides more thorough leak detection for critical applications.
Best Waterproofing Materials & Sealants for 2026
Top-Rated Sealants
Eternal Bond RV Repair Tape leads the market with permanent adhesion and UV resistance. Unlike liquid sealants requiring annual reapplication, quality tape systems last 10+ years.
Geocel ProFlex offers excellent adhesion to multiple surfaces with superior flexibility for high-movement areas like slide-out seals and window frames.
Dicor Self-Leveling Lap Sealant remains the standard for EPDM roof applications, though it requires more frequent reapplication than premium alternatives.
BlackSeries Material Advantages
BlackSeries employs military-specification waterproofing throughout their construction process:
- Welded aluminum frames eliminate potential leak points found in screwed assemblies
- Marine-grade window installations with dual-seal systems
- Reinforced roof structures that resist flexing and sealant failure
- Impact-resistant underbelly materials designed for extreme terrain
Premium Coating Systems
Liquid Rubber RV Roof Coating provides seamless protection with excellent flexibility and 15-year warranties. This polyurethane-based system bonds to most roof materials.
KST Coatings RV Flexseal offers the industry’s longest warranty (20 years) with superior UV resistance and thermal cycling performance.
Regional Waterproofing Strategies for US Climate Zones
Pacific Northwest: Heavy Rain & Humidity
Constant moisture requires enhanced ventilation and rapid-drying sealant systems. Install additional roof vents and use silicone-based sealants that maintain flexibility in wet conditions. Focus on preventing condensation buildup that can cause interior mold issues.
Rocky Mountain Region: Freeze-Thaw Cycles
Temperature extremes from -20°F to 100°F+ demand flexible waterproofing systems that maintain seal integrity through repeated expansion/contraction. Use polyurethane sealants with high elasticity ratings and inspect seals before and after winter storage.
Southwest Desert: Extreme UV & Heat
Intense UV radiation rapidly degrades standard sealants. Prioritize UV-resistant materials and consider reflective roof coatings that reduce surface temperatures. Schedule maintenance during cooler months when sealants cure optimally.
Southeast Coastal: High Humidity & Salt Air
Coastal environments accelerate corrosion and sealant deterioration. Use marine-grade materials and increase inspection frequency to monthly during peak humidity seasons. Pay special attention to metal hardware and fastener sealing.
Case Study: BlackSeries Waterproof Performance in Extreme Conditions
Real-World Testing: Pacific Coast Rain Forest
One BlackSeries HQ17 owner documented 6 months of continuous Pacific Northwest camping with zero interior moisture issues. Daily rainfall averaging 0.8 inches tested every seal and joint. The owner reported no sealant maintenance required during this period, compared to three repair incidents on their previous conventional travel trailer during similar conditions.
Desert Heat Validation: Arizona Summer Testing
A BlackSeries HQ19 underwent 120+ consecutive days parked in Phoenix-area desert with daily temperatures exceeding 115°F. Surface roof temperatures reached 180°F+ for hours daily. Post-test inspection revealed minimal sealant degradation compared to control trailers showing significant shrinkage and cracking.
Off-Road Durability: Colorado Backcountry
Six months of Colorado backcountry camping on rough 4WD roads demonstrated BlackSeries underbelly protection effectiveness. While companion trailers suffered punctures and tears requiring repair, the BlackSeries unit showed only superficial scuffing with no waterproof barrier compromise.
Engineering Advantages
BlackSeries waterproof superiority stems from:
- 3x thicker underbelly materials compared to standard RV construction
- Continuous welded seams eliminating hundreds of potential leak points
- Automotive-grade window systems with thermal expansion compensation
- Oversized drainage systems preventing water accumulation
Frequently Asked Questions
What sealant works best for travel trailer roofs?
Self-leveling polyurethane sealants offer the best combination of durability, UV resistance, and adhesion for most roof types. Dicor remains popular for EPDM roofs, while silicone-based sealants work well on TPO and fiberglass surfaces. Choose products specifically formulated for your roof material.
How often should I waterproof my travel trailer?
Inspect critical seals quarterly and plan major waterproofing maintenance every 2-3 years for standard RVs. Premium materials and construction can extend this to 5+ years. Climate affects timing: desert and high-UV environments require more frequent attention than temperate regions.
How do I detect hidden leaks in my RV?
Look for water stains, soft spots in flooring or walls, musty odors, and unexplained humidity increases. Use a moisture meter to test suspect areas. Professional leak detection services use thermal imaging and pressure testing for comprehensive assessment.
Can I use regular silicone caulk on my RV roof?
Never use household silicone on RV roofs. Standard silicone lacks UV stabilizers and flexibility needed for mobile applications. It also prevents proper adhesion of future repairs. Always use RV-specific sealants designed for your roof material.
What’s the difference between self-leveling and non-sag sealant?
Self-leveling sealants flow to create smooth, even coverage on horizontal surfaces like roof seams. Non-sag formulations stay in place on vertical surfaces without dripping. Use self-leveling for roof applications and non-sag for sidewall and window sealing.
Do off-road trailers like BlackSeries need more or less waterproofing maintenance?
Off-road trailers face more stress but quality units like BlackSeries actually require less maintenance due to superior initial construction. Welded frames, reinforced materials, and marine-grade sealants provide inherent durability that reduces long-term maintenance needs compared to standard RV construction.
Should I hire professionals for leak repairs?
Complex repairs involving structural damage or multiple leak sources benefit from professional assessment. Simple sealant replacement and preventive maintenance can be DIY projects with proper materials and techniques. Consider professional service for warranty preservation on newer units.
How long does roof coating typically last?
Quality liquid roof coatings last 10-15 years with proper application and maintenance. Warranty terms vary from 5-20 years depending on product quality and environmental exposure. Recoating every 10 years provides optimal long-term protection and cost-effectiveness.


I didn’t realize how much underbelly damage happens during off-road travel until I started boondocking more often. Last fall I tore a section of the plastic underbelly on a sharp rock. Since reinforcing it with a spray-on coating and a panel patch, it’s held up perfectly. Wish I’d known this sooner.