Spring is here, and it’s time to wake your travel trailer from its winter slumber. De-winterizing your RV is a critical process that ensures all systems are safe, functional, and ready for your upcoming camping adventures. Skipping essential steps or rushing through the process can lead to costly repairs, system failures, or compromised safety on the road.
Whether you stored your BlackSeries travel trailer in a covered facility or your driveway, winter conditions can impact various components. From frozen water lines filled with antifreeze to battery discharge and propane system issues, a thorough spring prep checklist is your roadmap to a successful camping season.
This comprehensive guide walks you through every aspect of de-winterizing your travel trailer, from exterior inspections to interior deep cleaning. Follow these systematic steps to ensure your rig is road-ready and safe for your family’s adventures.
1. Exterior Inspection and Cleaning
Roof and Seal Inspection
Start your de-winterizing process by thoroughly examining your trailer’s exterior. Winter weather can cause significant damage that isn’t immediately visible from ground level.
Check the roof carefully for:
- Cracked or damaged sealants around vents, antennas, and air conditioning units
- Loose or missing roof membrane sections
- Accumulated debris like branches, leaves, or snow damage
- Water stains indicating potential leak points
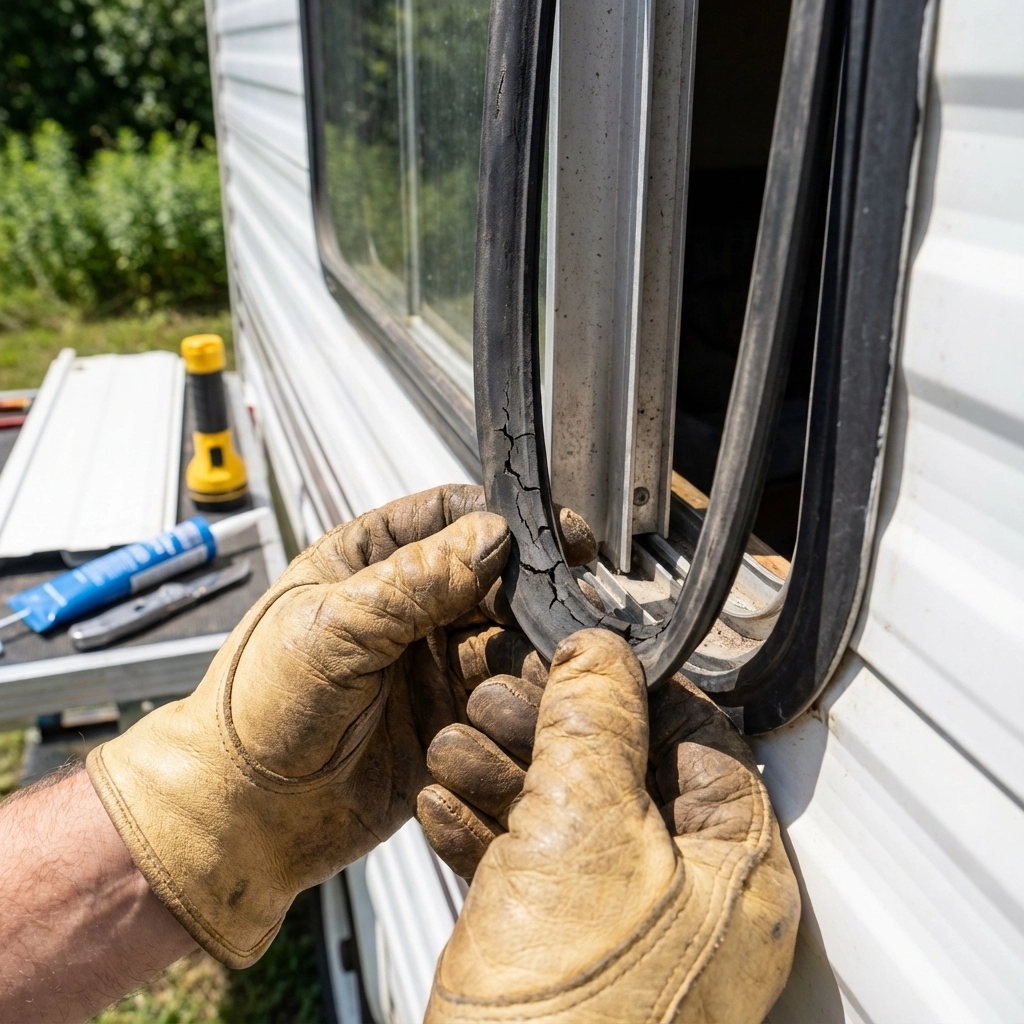
Inspect door and window seals:
- Run your fingers along all rubber seals to check for flexibility
- Look for cracks, tears, or hardened sections that may allow water infiltration
- Apply appropriate RV sealant to any compromised areas before your first trip
Tire Condition and Maintenance
Your tires have been supporting your trailer’s weight throughout winter storage, potentially developing flat spots or losing air pressure.
Complete tire inspection checklist:
- Check tire pressure against manufacturer specifications (usually found on the tire sidewall)
- Inspect tread depth and look for uneven wear patterns
- Examine sidewalls for cracks, bulges, or weathering
- Clean tires thoroughly to remove accumulated dirt, salt, and debris
- Consider tire rotation if you notice uneven wear
Exterior Washing and Protection
A thorough exterior cleaning does more than improve appearance, it helps you identify potential problems and protects your investment.
- Wash the entire exterior with appropriate RV cleaners
- Pay special attention to removing road salt and winter grime
- Apply a quality RV wax to protect against UV damage and weather exposure
- Clean and inspect exterior storage compartments for moisture or pest intrusion
2. Plumbing System Revival
Fresh Water Tank and Line Inspection
Your plumbing system requires the most attention during de-winterizing, as antifreeze must be completely flushed and the system sanitized.
Start with a visual inspection:
- Check the fresh water tank for visible cracks or damage
- Inspect all accessible water lines and fittings for leaks
- Examine the water pump for proper mounting and connections
Fill and test the system:
- Connect to a clean water source and fill your fresh water tank
- Monitor for any leaks as the tank fills
- Check that the tank gauge reads accurately

Antifreeze Removal and System Flushing
Properly removing antifreeze from your water system is crucial for safe drinking water and appliance operation.
Step-by-step flushing process:
- Open low-point drain valves and let antifreeze drain until water runs clear
- Connect fresh water hose to city water connection
- Turn on each faucet individually, hot and cold sides, running water until completely clear
- Don’t forget outdoor shower, toilet, and any additional water outlets
- Run water for additional 1-2 minutes at each fixture after antifreeze disappears
Water System Sanitization
After flushing antifreeze, sanitizing your fresh water system ensures safe drinking water throughout your camping season.
Bleach sanitization method:
- Mix 1/2 cup bleach per gallon of tank capacity (or 1 cup per 40 gallons)
- Fill fresh water tank with bleach solution
- Run each faucet until you smell bleach, ensuring solution reaches all lines
- Let solution sit for 4-6 hours minimum
- Drain completely and flush with fresh water until chlorine smell disappears
Water Heater Preparation
Your water heater requires special attention during de-winterizing, particularly if it was bypassed during winterization.
- Locate and close water heater bypass valves
- Install anode rod or drain plug if removed during winterization
- Fill water heater slowly, purging air from hot water lines
- Check for leaks around fittings and the tank itself
- Test water heater operation before your first camping trip
3. Battery and Electrical System Check
Battery Inspection and Maintenance
Winter storage can significantly impact battery performance and lifespan, making thorough inspection essential.
Complete battery assessment:
- Visually inspect for corrosion, cracks, or swelling
- Clean terminals with baking soda solution if corrosion is present
- Check battery fluid levels in serviceable batteries
- Test voltage with multimeter (12.6V+ indicates good charge)
- Load test battery if voltage seems low
For lithium battery systems: Check manufacturer-specific requirements, as these batteries may have different charging protocols and temperature considerations.
Electrical System Testing
Verify all electrical components function properly after winter storage.
- Test all interior and exterior lights, including running lights and turn signals
- Check outlet operation with a simple tester or small appliance
- Verify 12V accessories like fans, water pump, and furnace blower operate correctly
- Test converter/charger operation when plugged into shore power
Solar System Verification
If your BlackSeries trailer includes solar panels, ensure the system operates correctly after winter exposure.
- Visually inspect panels for damage, debris, or loose connections
- Check charge controller display for proper operation
- Verify battery charging occurs during sunny conditions
- Clean panels if necessary for optimal performance
For more detailed information about power systems, check out our travel trailer inverter guide.
4. RV Furnace and Propane System
Furnace Inspection and Testing
Your heating system needs verification before you encounter cold weather on your first camping trip.
Furnace system check:
- Remove any debris or blockages from exterior furnace vents
- Check interior vents for obstructions
- Test furnace ignition and operation through complete heating cycle
- Listen for unusual noises that might indicate blower or component issues
- Verify thermostat responds correctly to temperature adjustments
Propane System Safety Check
Propane system integrity is crucial for safe operation of appliances and heating systems.
Critical propane inspections:
- Visually inspect propane tanks for rust, dents, or valve damage
- Check all propane lines and fittings for damage or deterioration
- Perform leak test using soapy water solution on all connections
- Test propane appliances individually (stove, oven, refrigerator, water heater)
- Verify propane detector operation inside trailer
Never skip propane safety checks, leaks can create dangerous situations and should be addressed immediately by qualified technicians.
5. Tires and Suspension System
Comprehensive Tire Assessment
Beyond basic pressure checks, thorough tire evaluation prevents road failures and ensures safe towing.
Detailed tire inspection:
- Check sidewall date codes, replace tires over 7 years old regardless of tread
- Measure tread depth with penny test or tread gauge
- Look for irregular wear patterns indicating alignment or suspension issues
- Inspect for weathercracking, especially around sidewall flex areas
- Verify proper tire pressure when tires are cold
Suspension and Running Gear
Your trailer’s suspension components support thousands of pounds and deserve careful attention.
- Inspect leaf springs for cracks, broken leaves, or rust
- Check shock absorbers for leaks or damage
- Verify axle alignment and proper trailer leveling
- Examine suspension bolts and hardware for tightness
- Lubricate suspension components according to manufacturer specifications
6. Brakes and Tow System
Brake System Evaluation
Properly functioning brakes are essential for safe towing, especially with heavier off-road trailers.
Brake system checklist:
- Inspect brake pads through wheel openings if possible
- Check brake line connections and routing
- Test electric brake controller operation from tow vehicle
- Verify breakaway system battery charge and connection
- Listen for unusual noises during initial test applications
Tow Hitch and Connection Points
Your tow system components endure significant stress and require regular maintenance.
- Inspect hitch ball mount for cracks or excessive wear
- Check safety chains for damage or weak links
- Lubricate coupler mechanism and adjust if necessary
- Verify electrical connections are clean and secure
- Test all lighting functions with tow vehicle connected
7. Interior Restoration and Systems Check
Deep Cleaning and Moisture Control
Winter storage can lead to moisture accumulation and musty odors that require thorough attention.
Interior cleaning priorities:
- Remove all items stored inside during winter
- Vacuum thoroughly, including under cushions and in storage areas
- Wipe all surfaces with appropriate cleaners
- Check for signs of moisture damage, mold, or pest intrusion
- Use dehumidifiers or desiccant packs if humidity seems high
Appliance Testing and Calibration
Verify all interior appliances and systems function correctly after storage period.
- Test refrigerator operation on both 12V and propane modes
- Check stove and oven ignition and flame characteristics
- Verify air conditioning operation if equipped
- Test all entertainment systems and charging ports
- Run exhaust fans to ensure proper ventilation
Frequently Asked Questions
How often should I replace the anode rod in my water heater?
Check your anode rod annually during de-winterizing. Replace it when more than 75% of the rod has deteriorated, typically every 1-3 years depending on water quality and usage.
What should I do if I find antifreeze still coming from faucets after extensive flushing?
Continue flushing until water runs completely clear. Some systems have dead-end lines that trap antifreeze. If problems persist, consult your dealer or RV service center.
How do I know if my trailer’s brakes need professional service?
Signs include grinding noises, reduced stopping power, or uneven braking. Have brakes professionally inspected annually or if you notice any performance changes.
Can I skip sanitizing the water system if I only use bottled water?
No: sanitization prevents bacterial growth in your plumbing system that can cause odors and health issues, regardless of your drinking water source.
What’s the most important thing to check during de-winterizing?
While all systems matter, the plumbing system requires the most attention due to antifreeze removal and potential freeze damage that may not be immediately apparent.
Conclusion
Properly de-winterizing your travel trailer sets the foundation for a safe and enjoyable camping season. This systematic approach ensures every critical system receives appropriate attention, preventing costly repairs and dangerous situations on the road.
Take your time with each step: rushing through de-winterizing often leads to missed problems that become major issues later. Consider creating a personal checklist based on this guide, customized for your specific trailer model and accessories.
Your BlackSeries travel trailer is built for adventure, and proper spring preparation ensures it’s ready to take you anywhere your wanderlust leads. For more maintenance tips and adventure-ready trailer options, explore our complete BlackSeries RV blog for expert advice and the latest in off-road camping technology.
Start your spring prep early, and you’ll be ready to hit the trail as soon as adventure calls.

