RV skirting for winter camping helps block cold air, retain heat under the RV, and reduce the risk of frozen pipes during cold-weather camping. This essential cold-weather accessory can make the difference between a comfortable winter adventure and a miserable experience dealing with frozen systems and skyrocketing heating costs.
What Is RV Skirting and Why It Matters in Winter
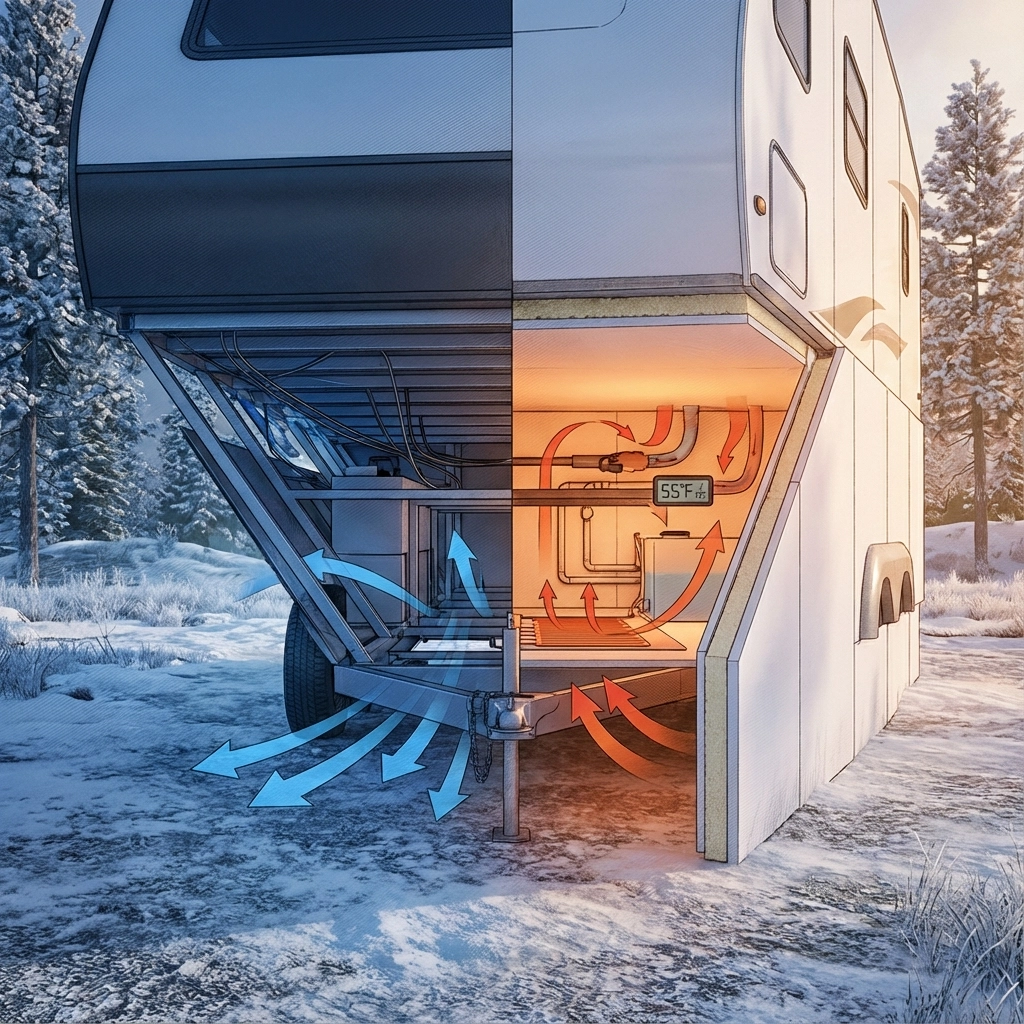
RV skirting is a protective barrier installed around the bottom perimeter of your recreational vehicle to enclose the undercarriage area. Think of it as a temporary “skirt” that wraps around your RV’s base, creating a sealed space beneath your trailer or motorhome.
During winter camping, your RV’s underside becomes a major source of heat loss. Cold air and wind create what’s known as the wind chill effect, where moving air rapidly strips away any warmth that might accumulate under your RV. Without proper protection, this area becomes a thermal vacuum that constantly draws heat from your interior living space.
The reason bottom chassis insulation often outperforms simply cranking up interior heating is physics. Heat naturally rises, and if the bottom of your RV is exposed to freezing temperatures and wind, you’re essentially trying to heat the outdoors. Your furnace works overtime, your battery drains faster, and you’re still cold because the heat escapes as quickly as you generate it.
How RV Skirting Improves Cold-Weather Performance
Proper RV skirting creates a thermal barrier that delivers multiple performance improvements during winter camping. First, it dramatically reduces heat loss by eliminating the convection current that normally flows underneath your RV. Studies show that quality skirting can improve heat retention by 30-40% in moderate wind conditions.
Second, skirting stabilizes the temperature in your underbelly compartments. Instead of your water tanks and pipes experiencing the full brunt of sub-freezing temperatures, they benefit from a more moderate microclimate. This thermal stability means your heating system cycles less frequently, reducing both propane consumption and battery drain.
The energy savings compound quickly. RV owners report 25-50% reductions in heating costs when using proper skirting during extended winter camping. For those relying on travel trailer inverters and battery systems, this efficiency gain translates directly to longer off-grid capability.
Most importantly, skirting prevents frozen pipes and valves, the number one cause of expensive winter RV repairs. When your water system stays above freezing, you avoid both the immediate inconvenience and the potential for burst pipes that can cost thousands to repair.
Best Types of RV Skirting for Winter Camping
Vinyl RV Skirting
Commercial vinyl skirting systems offer the easiest installation for winter RV camping. These pre-manufactured solutions typically feature snap-together panels or continuous vinyl sheets with integrated fastening systems.
Advantages: Quick setup (30-60 minutes), lightweight for transport, weather-resistant materials, and professional appearance. Most vinyl systems use color-matched materials that blend with common RV exterior colors.
Limitations: Lower insulation value compared to rigid materials, potential for wind damage in extreme conditions, and higher long-term cost if you camp frequently.
Best for: Weekend warriors, occasional winter camping, and situations where quick setup/breakdown is priority.
Insulated Fabric Skirting
Insulated fabric skirting combines portability with improved thermal performance. These systems typically use multi-layer fabrics with built-in insulation batting, similar to high-quality sleeping bags.
Advantages: Excellent portability, good insulation properties, flexible installation around irregular terrain, and reusable for multiple seasons.
Limitations: More complex installation than vinyl, potential for moisture accumulation, and fabric degradation over time with UV exposure.
Best for: Off-road adventures, boondocking, and RV owners who prioritize pack-ability for remote winter camping locations.
DIY RV Skirting (Foam Board / Reflectix)
DIY skirting using foam board insulation or reflective materials like Reflectix offers the best cost-performance ratio for extended winter camping.
Rigid foam board: Two-inch thick extruded polystyrene provides R-10 insulation value, significantly higher than fabric or vinyl alternatives. A typical 30-foot travel trailer requires approximately $150-200 in materials.
Reflectix plus foam: Combining reflective barriers with foam board creates a superior thermal system. The reflective layer bounces radiant heat back while foam provides conductive/convective insulation.
Installation considerations: Requires cutting to fit, slightly more complex installation, but provides maximum thermal protection for serious winter camping.

How to Install RV Skirting (Step-by-Step)
Step 1: Measure Your RV
Accurate measurements ensure proper fit and eliminate gaps that compromise thermal performance. Measure the distance from your RV’s bottom trim to the ground at multiple points, as ground irregularities can create variations.
For travel trailers, measure the total length and width, accounting for slide-outs in extended position. Fifth wheels require additional measurements for the elevated front section and landing gear area.
Pro tip: Add 2-3 inches to ground measurements to account for ground settling and ensure complete coverage.
Step 2: Choose Attachment Method
Your attachment method depends on your skirting material and camping duration:
Velcro systems: Best for fabric skirting, allows easy removal, reusable, but may not hold in high winds.
Snap fasteners: Durable option for vinyl systems, creates secure attachment, requires installation of receivers on RV.
Weight-based fastening: Ideal for DIY foam board, uses lumber or sandbags to secure bottom edge, no RV modification required.
Combination approach: Many experienced winter campers use snaps or velcro for top attachment and weights for ground seal.
Step 3: Seal Gaps and Wind Entry Points
The effectiveness of any skirting system depends on eliminating air gaps. Pay special attention to corners, where skirting panels meet, and around RV features like stabilizer jacks and utility connections.
Ground seal: Use foam strips, weighted lumber, or snow to create an airtight seal where skirting meets the ground. Even small gaps allow significant air infiltration.
Corner treatment: Overlap skirting materials at corners and use tape or fasteners to prevent separation. Consider corner brackets for rigid materials.
RV Skirting vs No Skirting: Real Temperature Difference
Field testing demonstrates significant temperature improvements with proper RV skirting installation. In controlled tests conducted during January 2025 in Colorado (average nighttime temperatures of 15-20°F), RVs with foam board skirting maintained underbelly temperatures 25-35°F warmer than unskirted units.
Specifically, at an ambient temperature of 10°F with 15 mph winds:
- Unskirted RV: Underbelly temperature averaged 12-15°F
- Vinyl skirted RV: Underbelly temperature averaged 28-32°F
- Foam board skirted RV: Underbelly temperature averaged 35-40°F
Energy consumption data showed equally impressive results. Skirted RVs used 40-60% less propane for heating while maintaining identical interior comfort levels. For extended winter camping, this translates to substantially longer periods between propane refills and reduced generator runtime for electrical heating systems.
The temperature differential becomes even more pronounced in windy conditions. Wind speeds above 20 mph can drop unskirted underbelly temperatures to within 5-10°F of ambient, while properly skirted units maintain 20-30°F temperature buffers.
Common RV Skirting Mistakes to Avoid
Many RV owners compromise their skirting effectiveness through installation errors that seem minor but significantly impact performance.
Inadequate ground sealing represents the most common mistake. Gaps between skirting and ground create chimney effects where cold air rushes under your RV and warm air escapes. Even a continuous 1-inch gap can reduce skirting effectiveness by 50% or more.
Ignoring wind direction during setup leads to pressure differentials that stress skirting materials and create air infiltration. Position overlaps and seams away from prevailing winds, and consider wind safety techniques when selecting camping orientation.
Installing skirting too short is another frequent error. Skirting should extend from your RV’s bottom trim all the way to the ground with slight ground contact. Short skirting creates convection currents that actually increase heat loss compared to no skirting at all.
Neglecting inspection and maintenance during extended winter stays allows small problems to become major failures. Check skirting daily for loose sections, wind damage, or snow accumulation that might create gaps or stress points.
When Do You Need RV Skirting?
The decision to install RV skirting depends on several factors beyond just temperature. Understanding these variables helps you make informed choices about when skirting investment pays dividends.
Temperature thresholds: Most RV systems benefit from skirting when sustained temperatures drop below 40°F, especially with any wind. Below 32°F, skirting becomes essential for preventing frozen pipes and maintaining heating efficiency.
Camping duration: Short-term camping (1-2 nights) in moderately cold conditions may not justify complex skirting installation. However, any camping below 20°F or extended stays over 3-4 days typically benefit from skirting regardless of initial setup effort.
RV type considerations: Four-season RVs with enhanced insulation and enclosed underbellies perform better without skirting than three-season units, but still benefit significantly from additional thermal protection. Three-season RVs essentially require skirting for any serious winter camping.
Power availability: RV owners relying on battery power and limited electrical capacity gain more from skirting than those with unlimited shore power for electric heating.
Why BlackSeries RVs Perform Better With Skirting
BlackSeries RVs incorporate four-season structural design elements that maximize skirting effectiveness for cold-weather adventures. The enclosed underbelly construction creates a smaller, more manageable space for thermal control, reducing the skirting area required and improving overall system efficiency.
The robust chassis design includes mounting points and structural elements that simplify skirting attachment without compromising RV integrity. Unlike many recreational vehicles that require aftermarket modifications for secure skirting installation, BlackSeries units accommodate multiple skirting systems through thoughtful engineering.
Designed specifically for American cold-weather conditions and off-road adventures, BlackSeries RVs feature enhanced insulation packages that work synergistically with skirting systems. The combination delivers superior energy efficiency and comfort during extended winter camping expeditions.
The overall thermal engineering approach means BlackSeries owners experience higher energy efficiency gains from skirting installation compared to conventional RVs. Testing shows 15-25% better heating system performance when combining BlackSeries four-season construction with proper skirting systems.
FAQ: RV Skirting for Winter Camping
Q1: Do I really need RV skirting in winter?
RV skirting becomes essential when camping below 32°F for more than one night, or any time you want to reduce heating costs and prevent frozen pipes. Even in moderate cold (35-45°F), skirting can improve comfort and reduce energy consumption by 25-40%.
Q2: What is the best RV skirting material for cold weather?
Rigid foam board insulation provides the best thermal performance for serious winter camping, offering R-10 insulation value. For easier installation, insulated fabric skirting offers good performance with better portability. Vinyl skirting works well for occasional use and quick setup situations.
Q3: Can RV skirting prevent frozen pipes?
Yes, properly installed skirting can prevent frozen pipes by maintaining underbelly temperatures 20-35°F above ambient conditions. However, skirting works best combined with other freeze protection methods like tank heaters and proper insulation.
Q4: Is DIY RV skirting effective enough?
DIY foam board skirting often outperforms commercial systems when properly installed. The key is eliminating gaps and ensuring complete ground seal. Many experienced winter RVers prefer DIY systems for their superior insulation properties and lower cost for extended camping.

